
ContentsContents
Azure Marketplace documentation
Azure Marketplace and AppSource publisher guide
Overview and Benefits
Storefronts
Comparing AppSource and Azure Marketplace
How to Publish on the Marketplace
Determine the Listing Type for Your Solution
Become a Publisher on the marketplace
Create a Microsoft Account
Register in Dev Center
Billing Options for Azure Marketplace
Publishing Guide by Offer Type
Virtual Machines
Azure Apps: Solution Templates
Azure Apps: Managed Applications
SaaS app publishing guide
Containers
Consulting Service
AppSource Apps
Enable Your Marketplace Trial Experience using Azure Active Directory
Grow your business through marketplace
Preferred Solutions
Support
Support for Azure Marketplace and AppSource
Cloud Partner Portal
Resources
Azure Roadmap
Pricing calculator
Publishing Checklist for AppSource

Learn about Azure Marketplace, an online applications and services marketplace that enables ISVs from startups to enterprises to
offer solutions to customers around the world.
AppSource and Azure Marketplace Publisher guideAppSource and Azure Marketplace Publisher guide
Cloud Partner PortalCloud Partner Portal

Azure Marketplace and AppSource publishing guide
7/24/2018 • 2 minutes to read • Edit Online
Benefits of participating in the Marketplace
Expand to new markets and segments and generate new sales opportunitiesExpand to new markets and segments and generate new sales opportunities
Enhance business value and increase deal size with existing and new customersEnhance business value and increase deal size with existing and new customers
Get actionable insightsGet actionable insights
Marketplace go
-
to
-
market benefitsMarketplace go
-
to
-
market benefits
The Marketplace publishing guide is designed to help new and existing publishers learn how to use storefronts in
the Azure Marketplace and Microsoft AppSource to grow their business in partnership with Microsoft by listing
applications and services.
This guide covers the following topics:
What the Marketplace is and how it works
The difference between Azure Marketplace and AppSource storefronts
The benefits of participating in the Marketplace
How to become a publisher and list your application or service
How to grow your business
This guide contains both technical and business information about the steps you need to take before you list your
applications and services. Use the table of contents to go to different sections of the guide and to go directly to
key topics.
For questions about the Azure Marketplace and AppSource, send us a message under Problem Type >
Marketplace Onboarding. Our Marketplace Publisher Onboarding Team will be happy to help!
The Marketplace is the launch pad for joint go
-
to
-
market activities with Microsoft that can help accelerate your
business growth. By using launch promotion, demand generation, and joint sales and marketing, your
Marketplace offers can be the centerpiece of your cloud business engine. There are no fees for participating in the
Marketplace.
Our goal is to connect Microsoft customers with the best solutions that our partner ecosystem offers. To do that,
we support you throughout your journey, from onboarding to publishing and growth.
Take advantage of the capabilities in the Marketplace to grow your business.
Use the Marketplace as a channel to access new markets, segments, and Microsoft cloud users with your portfolio
of solutions. Generate new marketing leads, and nurture new leads to sales opportunities. Benefit from joint
marketing and sales activities to get more customers.
Upsell and cross
-
sell your solutions by addressing customer problems after you move workloads to the cloud. If
you sell or deploy through the Marketplace, you can reduce sales cycles, accelerate projects, and increase deal
profitability by selling complete solutions that target specific workloads and industry scenarios.
Get insights on the performance of your listings through the insights and analytics that are available to you
through the Marketplace. Get more information about campaign performance, orders and payouts, and how to
maximize campaign activities for your solution.
New listings in the Marketplace are eligible for a diverse set of free benefits to help partners grow their business
in the Marketplace. These benefits fall into the following categories:

Next steps
Technical: Everything you need to get your application ready for launch. From technical support, application
design, and architecture design, to Azure credits for development and testing.
Co
-
marketing: Everything you need to launch your offer. Access free Microsoft Go
-
To
-
Market Launch
Fundamentals to help you launch and promote your solution. You might also be eligible for additional
Microsoft marketing campaign inclusion and opportunities to be featured in the Marketplace.
Co
-
selling: Begin or accelerate your journey to selling with Microsoft through the Marketplace. Access
programs and support to drive joint sales with Microsoft teams.
After you submit your solution to the Marketplace, our onboarding team contacts you to support your publishing
experience.
For more information about Microsoft Go
-
To
-
Market benefits and ways to grow your business in the
Marketplace, see Microsoft Go
-
To
-
Market Services.
Review in
-
depth information on cloud marketplace topics by exploring the table of contents to the left.

Comparing AppSource and the Azure Marketplace
7/19/2018 • 2 minutes to read • Edit Online
Understanding the differences between storefronts
AppSourceAppSource
BENEFIT DETAILS
Billing flexibility Provisions a trial experience. Currently, doesn't offer a
commerce
-
enabled publishing option. You can use your
current ordering and billing infrastructure with no additional
investment or changes.
Connections with other partners Links independent software vendors, system integrators, and
managed service providers to specific implementation
scenarios. You can collaboratively sell to new customers.
Automation Links independent software vendors, system integrators, and
managed service providers to specific implementation
scenarios. You can collaboratively sell to new customers.
Multiple cloud types Currently, doesn't support Azure Stack, Azure Government, or
regional clouds.
In
-
context presentation to customers Reach more customers through the in
-
app experience for
Microsoft products such as Dynamics 365, Power BI, and
Office 365.
Azure MarketplaceAzure Marketplace
BENEFIT DETAILS
Storefronts in the Azure Marketplace and Microsoft AppSource serve unique customer requirements. Use
storefronts to target customers by role. You can offer the right solution or service based on your customer.
To choose a storefront, begin by identifying the target audience for your offer. If you're targeting audiences in
multiple storefronts, you can publish once to sell in multiple storefronts.
The following tables describe the benefits of using a storefront:

Billing flexibility For VMs, Pay
-
As
-
You
-
Go billing options use Microsoft
Enterprise Agreements
(
EAs
)
or web direct sales models.
Pricing options include a Free Tier subscription, in which an
offering is perpetually free. Pricing options also include a Try It
Now subscription. A Try It Now subscription is promotionally
free for a limited period. When the period ends, the VM is
converted to a paid subscription. Bring Your Own License
(
BYOL
)
activation is also an option that you can use for
customers.
For both billing options and the following VM offers, all
provisioned Azure resources are billed directly to the
customer:
Connections with other partners Currently, you can't link a service provider or delivery partners
to your offer.
Automation Currently, you can't link a service provider or delivery partners
to your offer. Take advantage of automated software as a
service
(
SaaS
)
with add
-
on provisioning. Use the Azure apps:
Solution template publishing option to automate SaaS
-
based
data collection and deployment scenarios.
Multiple cloud types Publish solutions for both the public cloud and on
-
premises
by using the following types:
In
-
context presentation to customers Make your solution available in the Azure in
-
portal experience
for contextual search. Use the Virtual machine and Azure apps:
Solution template publishing options.
BENEFIT DETAILS
Next steps
Azure apps: Managed app
Azure apps: Solution template
Azure Stack
Azure Government
Regional clouds, including China and Germany
Review the Azure Marketplace and AppSource publishing guide.
Determine your publishing option
7/13/2018 • 4 minutes to read • Edit Online
NOTENOTE
Selecting a storefront, publishing option, and offer type for your
solution
Understand storefront selection
The publishing option that you choose for your offer relates directly to both the eligibility requirements and
marketplace GTM benefits. More importantly, the selection of publishing option and offer type in the Cloud
Partner Portal defines how users will interact with your marketplace offer.
You can enable publishing options by selecting an offer type and then creating a marketplace offer in the Cloud
Partner Portal. To do this, you’ll need to understand the following key marketplace concepts: the publishing
options, offer types and configuration, and calls
-
to
-
action that will govern how and where your offer is presented in
the marketplace storefronts.
The table above describes how your solution or service maps to the storefront, publishing option, and offer type used to
present your offer in marketplace.
In this article, you will learn…
How to determine the appropriate storefront for your solution
Which publishing options and calls
-
to
-
action are available in each storefront
Which offer types are available for each publishing option
Before you select a publishing option, it’s important to understand the storefront eligibility requirements for
marketplace solutions, apps, and services:
Azure Marketplace applications are technical “building
-
block” solutions built
-
on or built
-
for Azure. Azure
Marketplace consulting services are professional services offerings that help customers get started with or
accelerate the use of Azure.
AppSource applications are line
-
of
-
business solutions that can be built
-
on Azure or built
-
for: Dynamics 365,
Office 365, PowerBI, or Power Apps. AppSource consulting services are professional services offerings that help
customers get started with or accelerate usage of Dynamics 365 and Power BI.
Once you have registered to become a publisher and have received access to the Cloud Partner Portal for creating,
configuring, and publishing marketplace offers, you will:
1. Understand how the storefront for your offer will be determined
2. Choose a publishing option for your offer
3. Select an offer type and review the eligibility requirements
4. Build and configure your offer for publishing in the Cloud Partner Portal
NOTENOTE
Choose a publishing option
Select an offer type
Next Steps
The storefront where your offer will be presented, Azure Marketplace and/or AppSource, will be automatically
determined by your offer details and target audience, as well as the categories and industries selected by you when
creating your offer in the Cloud Partner Portal.
“Cross
-
listing”
(
for SaaS Apps only
)
: when a list or trial
-
based offer meets the criteria for both a technical and business user
audience, your offer will be listed in both storefronts. Learn more about the publishing options below.
The publishing options available offer differentiated customer engagement while giving you access to lead sharing
and Go
-
To
-
Market benefits. Select from three possible publishing options before using the Cloud Partner Portal to
create a marketplace offer. Note the calls
-
to
-
action that correspond with the publishing option:
List
–
Simple listing of your application or service that enables a marketplace user to request you to connect with
the customer via the Contact Me call
-
to
-
action.
Trial
–
Use marketplace to enhance discoverability and automate provisioning of your application’s trial experience,
enabling prospective users to use your SaaS, IaaS, or Microsoft in
-
app experience at no cost for a limited time
before they buy. The calls
-
to
-
action used for the trial publishing option are either: Free Trial or Test Drive.
Transact
–
Your application runs on Azure and can be provisioned as a resource directly into the customer’s Azure
subscription when the customer selects the Get it Now call to action. Your software license fees can optionally be
purchased and billed via the customer’s choice of payment instrument and terms, and you can choose to offer
time
-
limited access to your Free Software Trial
(
only available for Azure Marketplace.
)
Once you decide on a publishing option, you are ready to select the offer type that will be used to present your
offer.
The offer is the publishing object that you will create, publish, and manage in the Cloud Partner Portal. The offer
structure including the metadata, artifacts, and other content used to present the offer in the marketplace is defined
by the offer type.
Before you can create an offer, you must choose an offer type. The offer type will correspond to the type of solution,
app, or service offer that you wish to publish, as well as its alignment to Microsoft products and services.
A single offer type can be configured differently in the Cloud Partner Portal to enable different publishing options,
calls
-
to
-
action, provisioning, or pricing. The publishing option and configuration of the offer type also align to the
offer eligibility and technical requirements.
Be sure to review the storefront and offer type eligibility requirements in this Publisher Guide and the technical
publishing requirements before creating your offer.
Review the eligibility requirements in the publishing options by offer type section to finalize the selection and
configuration of your offer.
Review the publishing patterns by storefront for examples on how your solution maps to an offer type and
configuration.
Log in to the Cloud Partner Portal to create and configure your offer.

Become a Cloud Marketplace Publisher
7/20/2018 • 5 minutes to read • Edit Online
REGISTRATION STEP DURATION DETAILS
1 Register in Microsoft Partner
Network
15 min Register in Microsoft Partner
Network
2 Create a Microsoft Account 15 minutes Create a Microsoft ID
3 Submit the marketplace
registration form
15 min Submit the marketplace
nomination form
4 Sign into Cloud Partner
Portal
1
-
3 days Sign into Cloud Partner
Portal
5 Register in Microsoft
Developer Center
(
Dev
Center
)
(
for Azure
Marketplace transact offers
)
5
-
10 days Register in Dev Center
1. Register in Microsoft Partner Network
2. Create a Microsoft Account
This article covers registering as a cloud marketplace publisher. Depending on your selected publishing option, and
your current membership on Microsoft Partner Network some of the following steps may not be required. Once
registered you’ll be able to create marketplace offers for Azure Marketplace or AppSource.
(
required for Azure
Marketplace transact
offers; recommended for
others
)
| 15 min |
Participation in Microsoft’s cloud marketplace requires membership in the Microsoft Partner Network
(
MPN
)
,
which also provides key benefits, programs, and partner performance tracking. If your organization is not yet a
member, join the Microsoft Partner Network
(
MPN
)
to become an official Microsoft partner and receive additional
benefits and support for publishing in marketplace.
To register in Microsoft Partner Network, visit the Membership page and follow the steps to start your
enrollment.
After registering, record the Microsoft Partner Network ID for your organization. You will need this during step 3
when submitting your marketplace registration form.
Learn about the benefits of the Microsoft Partner Network
If your organization has an existing membership, then you will join your organization during registration. If you
use Partner Center, you will be able to see the ID in your Partner Center account. If you use Partner
Membership Center
(
PMC
)
, you will be able to see it in your Partner Membership Center account.
| 15 minutes |
NOTENOTE
3. Submit the marketplace registration form
4. Sign into Cloud Partner Portal
A Microsoft account, e.g. @outlook.com or @live.com, is used to access many Microsoft devices and services. It is
required for Azure Marketplace transact offers, and we recommend its use to all cloud publishers. For more
information on the benefits and uses of a Microsoft account, visit this page. You will use a personal Microsoft
account to access the Cloud Partner Portal, the publishing platform that you will use to create and manage your
marketplace offers.
[
! IMPORTANT
]
Please note that a Microsoft account associated with your work email will not allow you to access
the portal.
If you already have a Microsoft account, review the Guidelines for creating a Microsoft ID to manage a marketplace account
to determine if it can be used for marketplace publishing.
Users with an Azure Active Directory federated corporate account should read this article before attempting to create or use
your existing Microsoft Account.
For help creating or managing your Microsoft account, visit the Microsoft account help support pages.
| 15 mins |
Complete this brief registration form to become a marketplace publisher. The information submitted on this form
will be used to create a publisher account in the Cloud Partner Portal which will allow you to create, publish, and
manage marketplace offers.
You will be asked to include the following information:
Details about your organization, including your Microsoft Partner Network ID
(
which you can look up in either
Partner Center or Partner Membership Center
)
A brief description of your initial app or consulting services offer that you intend to publish, including the
Microsoft product or service to which your offer most closely aligns
The target audience for your app or service
| 1
-
3 days| Our Marketplace Onboarding Team will review and validate the marketplace registration details
provided in step 3. Once approved, you will receive a welcome email with account credentials and guidance on
signing
-
in to the Cloud Partner Portal.
You will use the Cloud Partner Portal to create, publish, and manage marketplace offers. Once you receive the
approval welcome email, you can immediately log into the Cloud Partner Portal with your Microsoft account to
access additional technical information about publishing to marketplace and creating your offer.
For more information about using Cloud Partner Portal, visit the Getting Started article in Learn section. You
must be logged in to the Cloud Partner Portal to access these details.
If you have questions or would like to schedule an onboarding overview call, please review other articles in this
Publisher Guide or open a support request under Problem Type > Marketplace Onboarding from within the
Cloud Partner Portal.
If you didn’t receive the welcome email, please check your spam folder for an email with the subject line
“Welcome to Microsoft Marketplace!.” If there is no email in your spam folder, please contact Microsoft support.
On the support page, please select: Problem Type > Marketplace Onboarding. Our Marketplace Publisher
Onboarding Team will be happy to assist with your inquiries.
5. Register in Dev Center
(
for Transact publishing option only
)
NOTENOTE
IMPORTANTIMPORTANT
Next steps
| 5
-
10 days |
A Dev Center account is required for offers that use the transact publishing option: includes virtual machines,
Azure apps, and SaaS apps configured to sell through Azure. The Dev Center account details are used by Microsoft
to validate the legal, tax, and banking information for your organization that will be used for payout purposes when
you sell and bill your software licensing fees through Azure Marketplace.
The Dev Center registration process can be started before creating your offer in Cloud Partner Portal, but must be
completed before publishing your marketplace offer. Given the 5
–
10 day typical duration of this step, we
recommend starting this process as soon as possible if you intend to use the transact publishing option.
The individual registering in Dev Center must be a valid representative of your organization and must provide
personal information to validate their identity. Register with your Microsoft account, created in step 2, and use the
same Microsoft account that you used to access the Cloud Partner Portal.
To register for a Dev Center account, start the signup process here.
For more information about creating a Microsoft account, visit the Create a Microsoft account section.
Once you have completed the Dev Center registration, link your Cloud Partner Profile with your Dev Center
account
(
see detailed steps here
)
. This step must be completed before publishing your transact offer.
To waive the $99 Developer Center registration fee, complete the marketplace registration form and you will receive an email
containing your promotional code.
Before you create a Microsoft Dev Center account, please verify that your organization does not already have a Dev Center
account to avoid duplicate accounts. For more information, visit the Register in Dev Center section.
Learn about the marketplace storefronts: AppSource and Azure Marketplace
Determine your offer for the marketplace
Guidelines
6/22/2018 • 4 minutes to read • Edit Online
Guidelines for Azure Marketplace
Guidelines for creating a Microsoft ID to manage a marketplace accountGuidelines for creating a Microsoft ID to manage a marketplace account
IMPORTANTIMPORTANT
Issue: Microsoft ID in an Azure AD federated domainIssue: Microsoft ID in an Azure AD federated domain
If more than one person requires access to the same Microsoft ID used to create your marketplace account, then
you should follow these guidelines to help you create a company account.
To authorize multiple users to access your Microsoft Developer Center
(
Dev Center
)
account, Microsoft recommends that you
use Azure Active Directory
(
Azure AD
)
to assign roles to individual users. Each user must access the account by signing in
with individual Azure AD credentials. Create your Microsoft ID by using an email address in a domain registered to your
company Microsoft suggests that the email not be assigned to an individual. An example is windowsapps@fabrikam.com .
For more information, visit the Issue: Microsoft ID in an Azure AD federated domain section.
Limit access to the Microsoft ID to the smallest possible number of developers.
Set up a corporate email distribution list
(
DL
)
that includes everyone who must access your Dev Center account.
Add the DL email address to your security information. The DL enables all of the employees on the list to
receive security codes when requested and to manage the security information for your Microsoft ID. If setting
up a distribution list is not feasible, then the owner of the individual email account must be available to access
and share the security code when prompted.
Add a company phone number that does not require an extension and is accessible to key team members.
In general, you should require developers to use trusted devices to sign into your Dev Center account. All key
team members should have access to the trusted devices. Using trusted devices to access reduces the
requirement for sending security codes when someone is accessing the Dev Center account.
If you are required to grant access to the Dev Center account from a non
-
trusted computer, then you should
limit access to no more than five developers. Ideally, your developers should access the account from computers
that share the same geographical and network location.
Frequently review and verify your security information.
For example, the owner is prompted when new security information is added to the Microsoft ID or
when the Microsoft ID is accessed from a new device.
To view your security information, visit the Security settings page located at
account.live.com/proofs/Manage.
Your Dev Center account should be primarily accessed from trusted computers. It is critical that you access from
trusted computers, because there is a limit to the number of codes generated per Dev Center account per week.
Using trusted computers also enables the most secure and consistent sign
-
in experience.
For more information about additional Dev Center account guidelines and security, visit the Opening a
developer account page located at docs.microsoft.com/windows/uwp/publish/opening
-
a
-
developer
-
account.
Your corporate account may be federated through Azure Active Directory
(
Azure AD
)
. If you try to create a
Microsoft ID using a corporate email address that is federated with Azure AD, then you receive an error. If you
receive an error, then you should check with your IT team to confirm your account is federated through Azure AD.
Next steps
Azure AD federated email is a known issue and Microsoft is working to resolving it.
For more information about Azure AD, visit the Azure Active Directory Documentation page located at
docs.microsoft.com/azure/active
-
directory.
Microsoft recommends a workaround. Follow these steps to create a new email address in the outlook.com
domain and create a rule to forward your communications.
1. Go to the Create account page and click on the Get a new email address link.
IMPORTANTIMPORTANT
IMPORTANTIMPORTANT
To sign up for your Microsoft ID, visit the Create account page located at signup.live.com/signup.
2. Create the new email address and enter a password. A new Microsoft ID and an email mailbox in the
outlook.com domain is created. Continue the registration process until the account is created.
You must use an email address or distribution list that is registered as a Microsoft ID to register in Dev Center.
Microsoft recommends that you use a distribution list to remove dependency from individuals. If your email address
or distribution list is not registered, then you must register now.
If your any email address is located in the Microsoft company domain, then you are not able to use it for
registration in Dev Center.
3. After you create the Microsoft ID with the Outlook email address, sign into your Outlook mailbox. Create an
email forwarding rule. The email forwarding rule should move all emails that are received in the Outlook
mailbox to the email address in your domain that you created to manage your marketplace account.
To sign into your Outlook mailbox, visit the Outlook page located at outlook.live.com/owa.
For more information about forwarding rules, visit the Use rules in Outlook Web App to automatically
forward messages to another account page located at support.office.com/article/Use
-
rules
-
in
-
Outlook
-
Web
-
App
-
to
-
automatically
-
forward
-
messages
-
to
-
another
-
account
-
1433e3a0
-
7fb0
-
4999
-
b536
-
50e05cb67fed.
4. The forwarding rule sends all email and communications received in the Outlook email account to the email
address in a domain registered to your company. Your outlook.com email address must be used to
authenticate in both Dev Center and Cloud Partner Portal.
Visit the Azure Marketplace and AppSource Publisher Guide page.
Register in Dev Center
7/16/2018 • 7 minutes to read • Edit Online
To help verify that you are not logged into a personal browser account, open a new Internet Explorer InPrivate or
Chrome Incognito browsing session.
1. Register as a seller in Dev Center.
To sign in and register as a seller, visit the Azure Dev Center page located at
dev.windows.com/registration?accountprogram=azure.
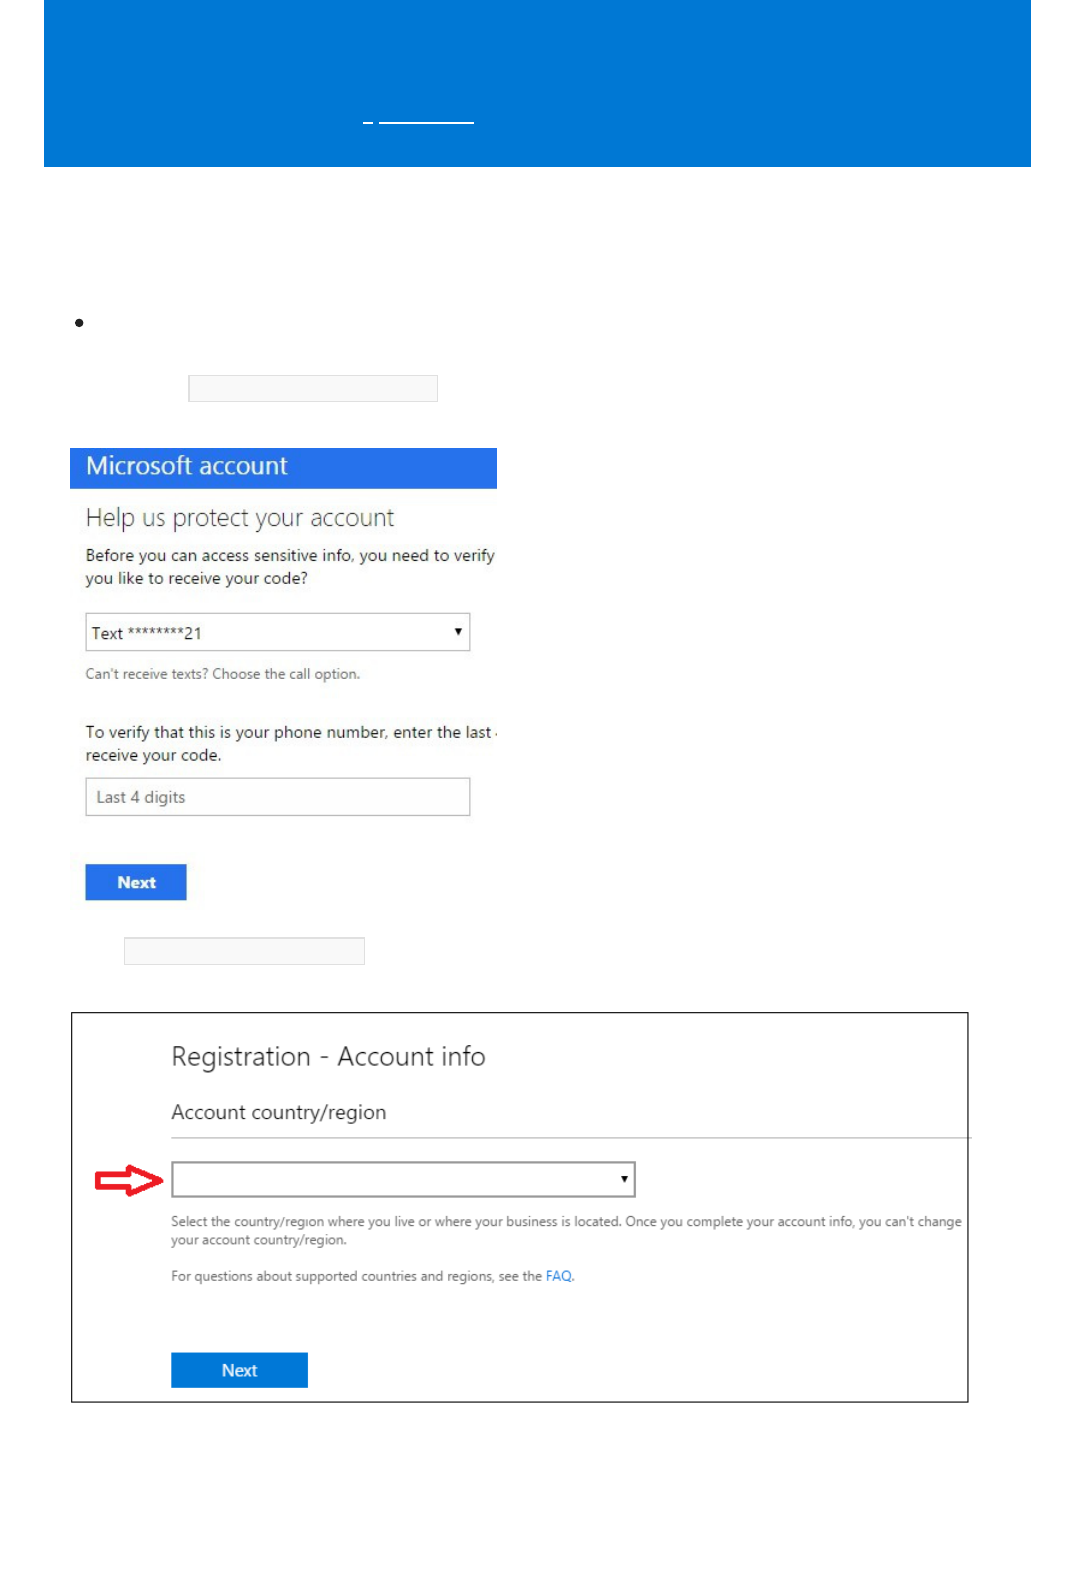
2. Complete the Help us protect your account wizard, which verifies your identity using your phone number
or email address.
3. In the Registration - Account Info section, select your account country or region from the Account
country/region drop
-
down menu.

WARNINGWARNING
NOTENOTE
IMPORTANTIMPORTANT
To sell your services in Azure Marketplace, verify that your registered entity is from one of the approved sell
-
from
countries. The location restriction is required for payout and taxation reasons.
For more information, visit the Azure Marketplace Participation Policies page located at
azure.microsoft.com/support/legal/marketplace/participation
-
policies.
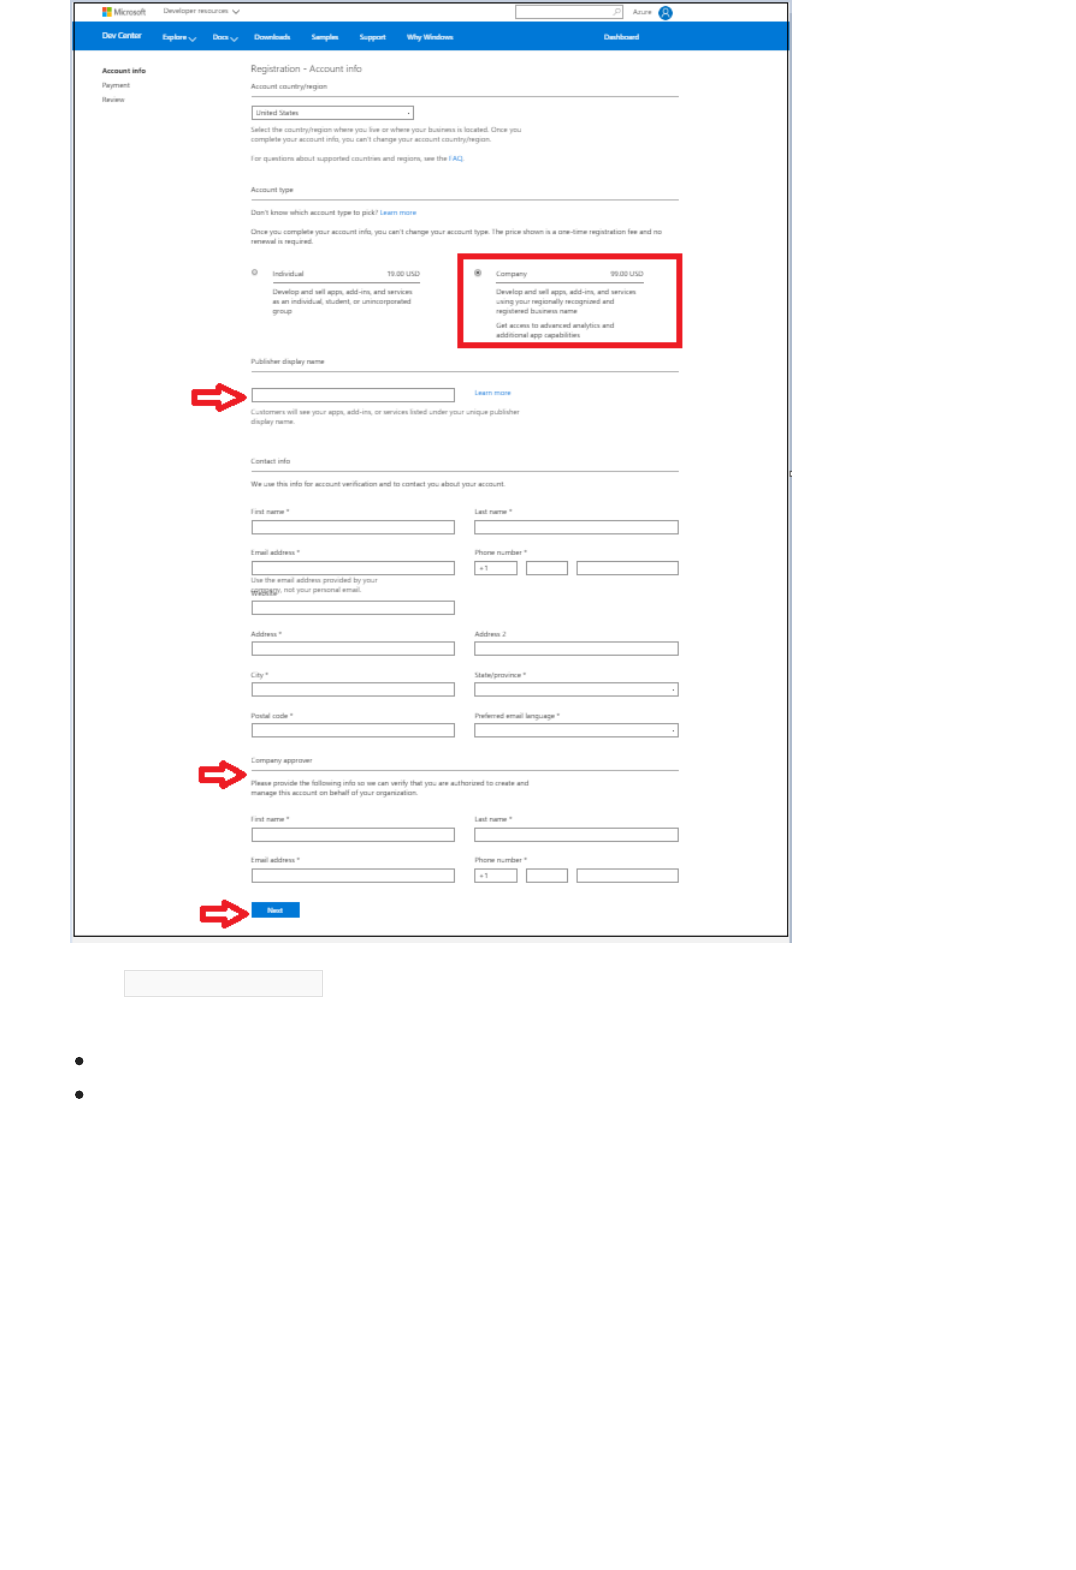
4. For Account Type, select the Company radio button.
For more information about account types and to assist in determining which is best for you, visit the
Account types, locations, and fee page located at docs.microsoft.com/windows/uwp/publish/account
-
types
-
locations
-
and
-
fees.
Click on the Next button.
5. For Publisher display name, enter the display name
(
typically the name of your company
)
.
The publisher display name entered in Dev Center is not displayed in Azure Marketplace when your offer is listed, but
you must fill this box to complete the registration process.
6. For Contact info, enter the information required for the account verification.
You must provide accurate contact information. The verification process uses your contact information to approve
your company in Dev Center.
7. For Company Approver, enter the contact information for the approver. An approver verifies that you are
authorized to create an account in Dev Center for your organization.
Click on the Next button.
8. In the Registration - Payment section, you must enter your payment information to pay for your Dev
Center account.
For Promo code, enter a promo code that covers the cost of registration.
For Billing, provide your credit card information. PayPal information may be used in place of a credit card
in supported markets.
Click on the Next button.

BILLING MODEL NEX T STEPS
Free Go to Cloud Partner Portal.
Commercial
(
transact
)
Update your account information.
9. In the Registration - Review section, review your account information and confirm that everything is
correct.
Read the terms and conditions of the Microsoft Azure Marketplace publisher agreement.
Click on the check
-
box to indicate that you have read and accepted the terms.
Click on the Finish button to be sent a confirmation email message.
10. Choose the next steps using the billing model for your offer.
To publish on the Azure Marketplace, visit the
Cloud Partner Portal page located at
cloudpartner.azure.com.
For more information about adding account
information, visit the How to Add bank and tax
information section.
An example of a commercial offer is a VM offer with an hourly billing model.
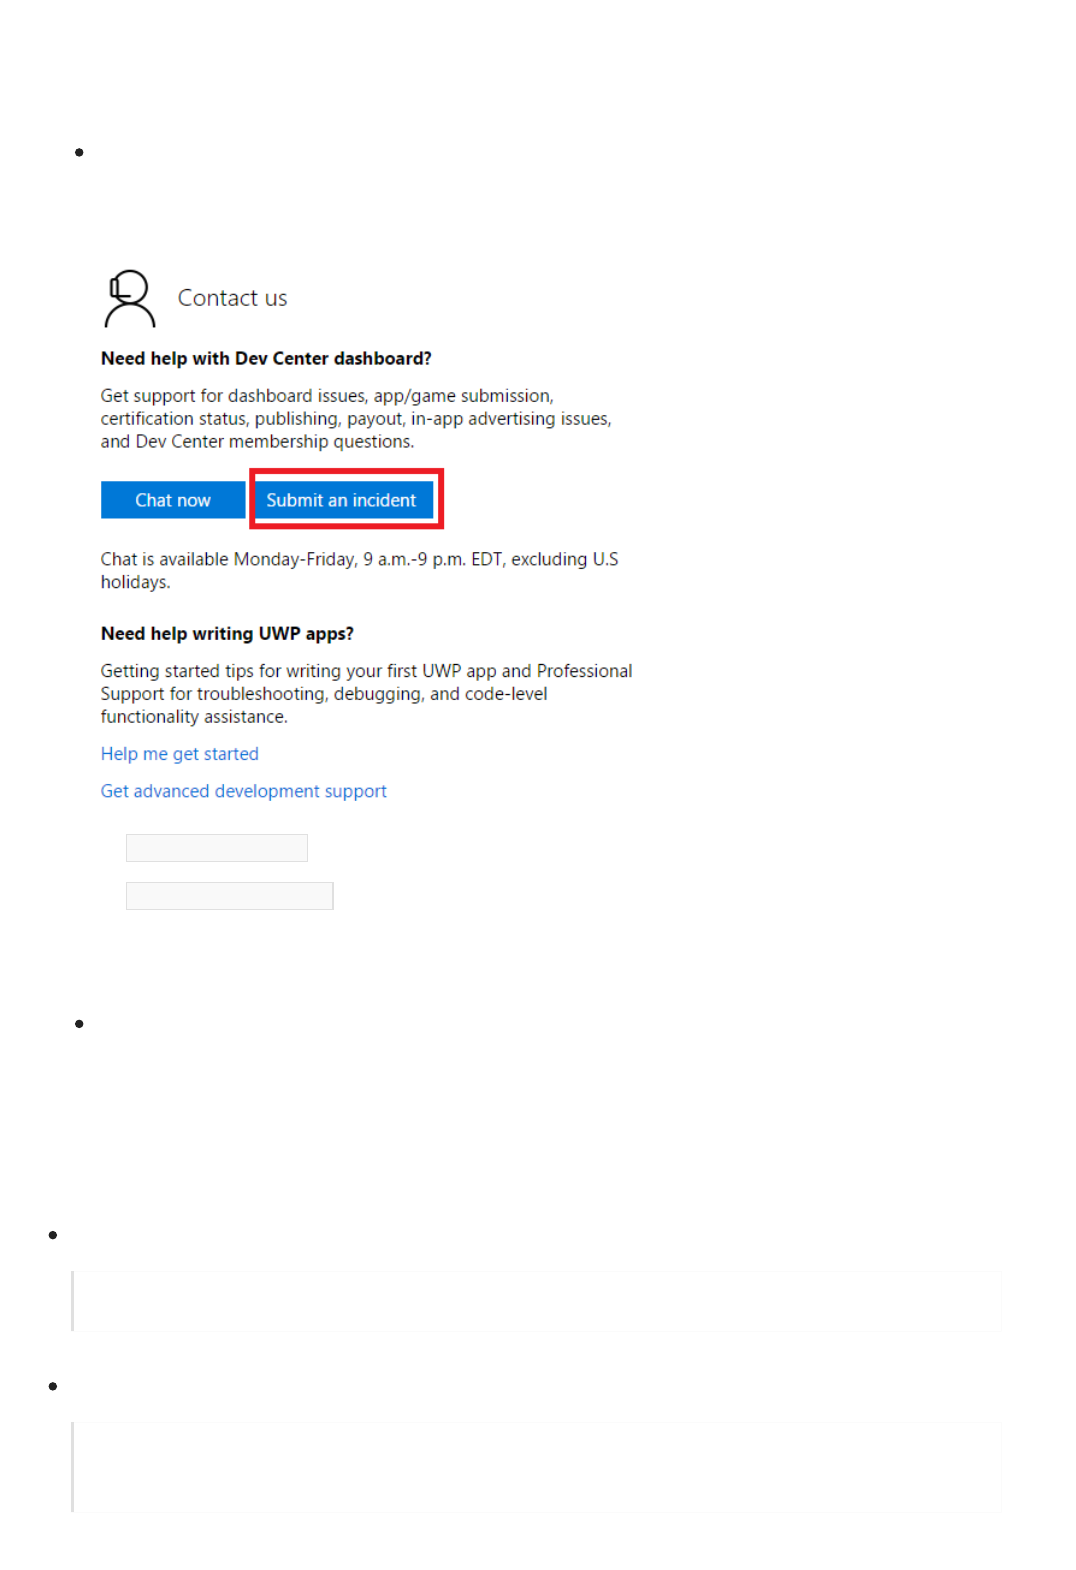
Get Help with Dev Center Registration
Frequently Asked Questions:
If you have issues with Dev Center registration, then follow these steps to submit a support ticket.
1. Go to Dev Center support.
3. On the sign
-
in page, sign in using any Microsoft ID. If you do not have a Microsoft ID, then create one.
4. Fill in the details of the issue.
5. To submit the ticket, click on the Submit button.
To access support, visit the Windows developer support page located at
developer.microsoft.com/windows/support.
2. In Contact Us section, click on the Submit an incident button.
Select Help with Dev Center from the Problem type drop
-
down menu.
Select Publish and manage apps from the Category drop
-
down menu.
Click on the Start email button.
For more information about creating a Microsoft ID, visit the Guidelines for creating a Microsoft ID to
manage an Azure Marketplace account section.
Which publishers requires a Dev Center account registration?
Publisher who are publishing in Transact listing type: VM, Azure apps: solution templates and managed
apps.
Why is Dev Center account required?
Dev Center account is a required to enable Microsoft to bill the customer on the publisher’s behalf for
Transact listing type. Dev Center account registration enables Microsoft to validate the legal, tax, and
banking information for your company. To learn more click here.

How do I get started with Dev Center registration?
To prevent duplication, verify that your company does not already have a Dev Center account registered.
You must be signed in with the Microsoft account that you want to associate with your developer
account. If you don’t already have a Microsoft account, you can create a new account here.
(
example:
contoso_marketplace@live.com
)
To sign in and register, go to https://dev.windows.com/en
-
us/registration?accountProgram=Azure
To learn more on registration process click here.
Should I choose 'Individual' or 'Company' account type?
To publish a transact offer on Marketplace, you need to select Company account when registering for
your Dev Center account.
Can I change my account type from 'Individual' to 'Company' account after account creation?
No, the account type cannot be updated once the account is created.
Why do I get a ‘City is required’ error message though I have entered the city correctly?
Check to make sure the zip code is correctly entered too. There is a city, zip code validation.
How can I get a promo code?
Complete the Marketplace Registration form to receive a Dev Center promotional code.
What should I expect after I complete the registration?
Look for an email from verify@microsoft.com with subject line “Action needed: Verify your email
account with Microsoft”. Click on the time sensitive verification link to complete registration. If you have
not received an email within 24hrs, please check the spam folder.
What are the next steps after Dev Center verification?
Go to “Your programs”
(
https://developer.microsoft.com/en
-
us/dashboard/Account/Programs
)
and log
into the Dev Center account. You should see a section titled “Recommended programs for you” and
under that, Azure. You will click “Get Started” and go through the process of setting up an Azure
account.
Why is my Dev Center application rejected?
The third
-
party vetting company
(
Duns & Bradstreet
)
was unable to contact you through the phone
number that you have provided. Contact support at developer.microsoft.com/windows/support to re
-
start the vetting process
or
Account registration are rejected based on geography issues. Companies with subsidiaries based in locations
different than the headquarters will only need one Dev Center account.
What should I do if the company name that I want to use already exists in Dev Center?

Issue: Add bank and tax information for publisher payouts
Add bank information
Assign a temporary company name, contact support at developer.microsoft.com/windows/support and
provide them your business registration documents.
How do I add my tax and payout information?
You will not be able to publish transact offers without completing the tax and bank information in your
Dev Center account. For more information about adding account information, visit How to Add bank
and tax information.
Can I change the Dev Center Microsoft login account?
No. Once a Dev Center is created, the owner account cannot be changed. You would have to start over
with a brand
-
new Dev Center account with the desired Microsoft account.
Where do I contact support with issues regarding Dev Center registration? To access support, visit
the Windows developer support page located at developer.microsoft.com/windows/support.
The bank and tax information is required for all commercial offers using the transact listing type.
IMPORTANTIMPORTANT
If you are publishing commercial offers for purchase, then you must add payout and tax information and
request validation in Dev Center.
For commercial offers
(
transact
)
, you must complete the bank and tax information before you are able to push your
offers to production.
If you are publishing only free or BYOL offers, then you are not required to add the information. You may
add the information later, but validation of the tax information takes some time. If you plan to offer
commercial offers for purchase, then you should add the information as soon as possible.
1. Sign into Dev Center using your Microsoft ID.
2. Select Payout account on the left menu.
IMPORTANTIMPORTANT
To sign into Dev Center, visit the Windows Dev Center page located at dev.windows.com.
3. On the Choose payment method page, select Bank account or PayPal .
If you have commercial offers that customers purchase on the Marketplace, then your payout account is where you
receive payout for the purchases.
4. Enter the payment information. After you have verified that the information is correct, click on the Save
button.
Add tax information
Next steps
IMPORTANTIMPORTANT
If you update or change your payout account, then you must follow the same steps replacing the current information
with the new information. Changes to your payout account may delay payments up to one payment cycle. This delay
occurs because Microsoft must verify the account change, this is the same as when you first set
-
up your payout
account. You get paid the full amount after your account has been verified. Any payments due from the current
payment cycle are added to the next cycle.
5. Click on the Next button.
1. Sign into Dev Center using your Microsoft ID.
2. Select Tax profile on the left menu.
4. Enter your tax details.
5. Click on the Next button.
To sign into Dev Center, visit the Windows Dev Center page located at dev.windows.com.
3. On the Set up your tax form page, select the country or region where you have permanent residency.
Select the country or region where you hold primary citizenship.
Click on the Next button.
Visit the Azure Marketplace and AppSource Publisher Guide page.
Billing options in the Azure Marketplace
7/19/2018 • 2 minutes to read • Edit Online
Commercial considerations in the Marketplace
Pay
-
As
-
You
-
Go and BYOL billing options
This article describes billing options that are available in the Azure Marketplace.
The Marketplace doesn't share revenue for the following listing types:
List
Trial
Transact using the Bring Your Own License
(
BYOL
)
billing model
You aren't billed additional fees for participating in storefronts in the Marketplace.
For more information, see Microsoft Azure Marketplace Participation Policies.
When you use a Pay
-
As
-
You
-
Go billing model as a publishing option, your usage
-
based software licensing revenue
is shared in an 80%/20% split between you and Microsoft. You can price a single offer both by using Pay
-
As
-
You
-
Go and BYOL billing models. The two billing models coexist at the offer level as separate SKUs. You configure the
billing models in your offer in the Cloud Partner Portal.
Consider the following examples:
YOUR LICENSE COST $1.00 PER HOUR
Azure usage cost
(
D1/1
-
Core
)
$0.14 per hour
Customer is billed by Microsoft $1.14 per hour
MICROSOFT BILLS $1.14 PER HOUR
Microsoft pays you 80% of your license cost $0.80 per hour
Microsoft keeps 20% of your license cost $0.20 per hour
Microsoft keeps the Azure usage cost $0.14 per hour
YOUR LICENSE COST LICENSE FEE NEGOTIATED AND BILLED BY YOU
Azure usage cost
(
D1/1
-
Core
)
$0.14 per hour
Customer is billed by Microsoft $0.14 per hour
If you enable the Pay
-
As
-
You
-
Go option, you have the following result:
In this scenario, Microsoft bills $1.14 per hour for use of your published VM image:
If you enable the BYOL option, you have the following result:

Single billing and payment methods
Enterprise Agreement
Monetary commitmentMonetary commitment
Next steps
MICROSOFT BILLS $0.14 PER HOUR
Microsoft keeps the Azure usage cost $0.14 per hour
Microsoft keeps 0% of your license cost $0.00 per hour
In this scenario, Microsoft bills $0.14 per hour for use of your published VM image:
An important benefit of using the Transact publishing option in the Marketplace is that your licensing costs and
Azure usage are single
-
billed directly to your customer.
In this scenario, Microsoft bills and collects on your behalf. Microsoft billing removes the requirement for you to
create your own procurement relationship with your customer. Single billing might save you time and resources. It
also might help you focus on landing the sale instead of on collecting the bill.
If you're a Microsoft Enterprise Agreement customer, you can use your Enterprise Agreement to pay for Microsoft
products. You can be billed for products, including for your Azure usage. Using your Enterprise Agreement to pay
is designed for organizations that want to license software and cloud services for three or more years. You spread
out payments instead of making one. upfront payment. If you use a Pay
-
As
-
You
-
Go publishing option, the billing
for your software licensing costs follows the quarterly Enterprise Agreement overage billing cycle.
If you're an Enterprise Agreement customer, you can add Azure to your agreement. You add Azure to your
agreement by making an upfront monetary commitment to Azure. Your monetary commitment is consumed
throughout the year. Your commitment includes any combination of usage of Azure services.
Review the Azure Marketplace and AppSource publishing guide.

Virtual Machine Offer Publishing Guide
7/13/2018 • 3 minutes to read • Edit Online
Free Trial
REQUIREMENTS DETAILS
Free trial period and trial experience Your customer may try your app for free for a limited time.
Your customer is not required to pay any license or
subscription fees for your offer. Your customers are not
required to pay for the underlying Microsoft first
-
party
product or service. All trial options are deployed to your Azure
subscription. You have sole control of the cost optimization
and management. You may choose a free trial or interactive
demo. No matter what you choose, your free trial must
provide the customer a pre
-
set amount of time to try your
offer at no additional cost.
Easily configurable, ready
-
to
-
use solution Your app must be easy and quick to configure and set up.
Availability / uptime Your SaaS app or platform must have an uptime of at least
99.9%.
Azure Active Directory Your offer must allow Azure Active Directory
(
Azure AD
)
federated single sign
-
on
(
SSO
)
(
Azure AD federated SSO
)
with
consent enabled.
Test Drive
REQUIREMENTS DETAILS
You have a Marketplace app One or more virtual machines through IaaS or SaaS.
Interactive Demo
Virtual Machine images are one of the main ways to publish a solution in the Azure Marketplace. Use this guide to
understand the requirements for this offer.
These are transaction offers which are deployed and billed through the Marketplace. The call to action that a user
sees is "Get It Now."
You can arrange for users to test your offer by accessing limited term software licenses when using the Bring Your
Own License
(
BYOL
)
blling model. Below are the requirements to deploy this offer.
You deploy one or more virtual machines through infrastructure
-
as
-
a
-
service
(
IaaS
)
or SaaS apps. A benefit of the
test drive publishing option is the automated provisioning of a virtual machine or entire solution led by a partner
-
hosted guided tour. A test drive provides an evaluation at no additional cost to your customer. Your customer does
not need to be an existing Azure customer to engage with the trial experience.
Email amp
-
testdrive@microsoft.com to get started.
You provide a guided experience of your solution to your customers by using an interactive demonstration. The
Virtual Machine Offer
NOTENOTE
NOTENOTE
REQUIREMENT DETAILS
Billing and metering Your VM must support either BYOL or Pay
-
As
-
You
-
Go
monthly billing.
Azure
-
compatible virtual hard disk
(
VHD
)
VMs must be built on Windows or Linux.
Next Steps
benefit of interactive demo publishing option is that you provide a trial experience without complicated
provisioning of your complex solution.
Use the virtual machine offer type when you deploy a virtual appliance to the subscription associated with your
customer. VMs are fully commerce enabled using pay
-
as
-
you
-
go or bring
-
your
-
own
-
license
(
BYOL
)
licensing
models. Microsoft hosts the commerce transaction and bills your customer on your behalf. You get the benefit of
using the preferred payment relationship between your customer and Microsoft, including any Enterprise
Agreements.
At this time, the monetary commitments associated with an Enterprise Agreement are able to be used against the Azure
usage of your VM, but not against your software licensing fees.
You are able to restrict the discovery and deployment of your VM to a specific set of customers by publishing the image and
pricing as a Private offer. Private offers unlock the ability for you to create exclusive offers for your closest customers and offer
customized software and terms. The customized terms enable you to highlight a variety of scenarios, including field
-
led deals
with specialized pricing and terms as well as early access to limited release software. Private offers enable you to give specific
pricing or products to a limited set of customers by creating a new SKU with those details.
For more information about Private Offers, visit the Private Offers on Azure Marketplace page located at
azure.microsoft.com/blog/private
-
offers
-
on
-
azure
-
marketplace.
For more information about creating a Linux VHD, visit
the Create an Azure
-
compatible VHD
(
Linux
-
based
)
section located at
docs.microsoft.com/azure/marketplace
-
publishing/marketplace
-
publishing
-
vm
-
image
-
creation#2
-
create
-
an
-
azure
-
compatible
-
vhd
-
linux
-
based.
For more information about creating a Windows VHD,
visit the Create an Azure
-
compatible VHD
(
Windows
-
based
)
section located at
docs.microsoft.com/azure/marketplace
-
publishing/marketplace
-
publishing
-
vm
-
image
-
creation#3
-
create
-
an
-
azure
-
compatible
-
vhd
-
windows
-
based.
If you haven't already done so,
Register in the marketplace
If you're registered and are creating a new offer or working on an existing one,


Azure Applications: Solution Template Offer
Publishing Guide
7/13/2018 • 2 minutes to read • Edit Online
Requirements for Solution Templates
REQUIREMENTS DETAILS
Billing and metering The resources will be provisioned in the customer’s Azure
subscription. Pay
-
as
-
you
-
go
(
PAYGO
)
virtual machines will be
transacted with the customer via Microsoft, billed via the
customer’s Azure subscription
(
PAYGO
)
In the case of bring
-
your
-
own
-
license, while Microsoft will bill
infrastructure costs incurred in the customer subscription, you
will transact your software licensing fees to the customer
directly
Azure
-
compatible virtual hard disk
(
VHD
)
VMs must be built on Windows or Linux.
Next Steps
Solution Templates are one of the main ways to publish a solution in the Marketplace. Use this guide to understand
the requirements for this offer.
These are transaction offers which are deployed and billed through the Marketplace. The call to action that a user
sees is "Get It Now."
Use the Azure app: solution template offer type when your solution requires additional deployment and
configuration automation beyond a simple VM. You may automate the provisioning of one or more VMs using
Azure apps: solution templates. You may also provision networking and storage resources. Azure apps: solution
templates offer type provides automation benefits for single VMs and entire IaaS
-
based solutions.
For more information about creating a Linux VHD, visit
the Create an Azure
-
compatible VHD
(
Linux
-
based
)
section located at
docs.microsoft.com/azure/marketplace
-
publishing/marketplace
-
publishing
-
vm
-
image
-
creation#2
-
create
-
an
-
azure
-
compatible
-
vhd
-
linux
-
based.
For more information about creating a Windows VHD,
visit the Create an Azure
-
compatible VHD
(
Windows
-
based
)
section located at
docs.microsoft.com/azure/marketplace
-
publishing/marketplace
-
publishing
-
vm
-
image
-
creation#3
-
create
-
an
-
azure
-
compatible
-
vhd
-
windows
-
based.
If you haven't already done so,
Register in the marketplace
If you're registered and are creating a new offer or working on an existing one,

Azure Applications: Managed Application Offer
Publishing Guide
7/13/2018 • 2 minutes to read • Edit Online
NOTENOTE
Managed Application Offer
REQUIREMENTS DETAILS
Deployed to a customer’s Azure subscription Managed Apps must be deployed in the customer’s
subscription and can be managed by a 3rd party
Billing and metering The resources will be provisioned in the customer’s Azure
subscription. Pay
-
as
-
you
-
go
(
PAYGO
)
virtual machines will be
transacted with the customer via Microsoft, billed via the
customer’s Azure subscription
(
PAYGO
)
In the case of bring
-
your
-
own
-
license, while Microsoft will bill
infrastructure costs incurred in the customer subscription, you
will transact your software licensing fees to the customer
directly
Solution Templates are one of the main ways to publish a solution in the Marketplace. Use this guide to understand
the requirements for this offer.
These are transaction offers which are deployed and billed through the Marketplace. The call to action that a user
sees is "Get It Now."
Use the Azure app: managed app offer type when the following conditions are required:
You deploy either a subscription
-
based solution for your customer using either a VM or an entire IaaS
-
based
solution.
You or your customer require that the solution is managed by a partner.
For example, a partner may be an SI or managed service provider
(
MSP
)
.
Azure
-
compatible virtual hard disk
(
VHD
)
VMs must be built on Windows or Linux.
REQUIREMENTS DETAILS
NOTENOTE
Next Steps
For more information about creating a Linux VHD, visit
the Create an Azure
-
compatible VHD
(
Linux
-
based
)
section located at
docs.microsoft.com/azure/marketplace
-
publishing/marketplace
-
publishing
-
vm
-
image
-
creation#2
-
create
-
an
-
azure
-
compatible
-
vhd
-
linux
-
based.
For more information about creating a Windows VHD,
visit the Create an Azure
-
compatible VHD
(
Windows
-
based
)
section located at
docs.microsoft.com/azure/marketplace
-
publishing/marketplace
-
publishing
-
vm
-
image
-
creation#3
-
create
-
an
-
azure
-
compatible
-
vhd
-
windows
-
based.
Managed apps must be deployable through the Marketplace. If customer communication is a concern, then you should reach
out to interested customers after you have enabled lead sharing.
If you haven't already done so,
Register in the marketplace
If you're registered and are creating a new offer or working on an existing one,
Log in to Cloud Partner Portal to create or complete your offer

SaaS applications Offer Publishing Guide
7/13/2018 • 5 minutes to read • Edit Online
Offer overview
STOREFRONT OPTION LISTING TRIAL/TRANSACT
AppSource Yes
(
Contact Me
)
Yes
(
PowerBI/Dynamics
)
Azure marketplace No Yes
(
SaaS Apps
)
SAAS APPS OFFER BUSINESS REQUIREMENTS TECHNICAL REQUIREMENTS
Contact Us Yes No
PowerBI / Dynamics Yes Yes
(
Azure AD integration
)
SaaS Apps Yes Yes
(
Azure AD integration
)
SaaS List
REQUIREMENTS DETAILS
Your app is a SaaS offering Your solution is a SaaS offering and you offer a multitenant
SaaS product.
SaaS Trial
SaaS applications can be published in the marketplace with three different calls to action: "Contact Me," "Try it
now," and "Get it Now." This guide explains these three options, including requirements for each.
SaaS applications are available in both Azure Storefronts The following table describes the current available
options:
List: The Listing publishing option consists of a Contact Me offer type and is used when a Trial
-
or Transaction
-
level participation is not feasible. The benefit of this approach is that it enables publishers with a solution in
-
market
to immediately begin receiving leads that can be turned into deals to increase your business.
Trial/Transaction: The customer has the option to directly buy or request a trial for your solution. Providing a Trial
experience increases the engagement level offered to customers and enables customers to explore your solution
before buying. With a Trial experience, you will have better chances of promotion in the storefronts, and you should
expect more and richer leads from customer engagements. Trials must include free support at least for the duration
of the trial period.
The call to action for a SaaS listing with no trial and no billing functionality is "Contact Me."
You do not need to configure Azure Active Directory to list a SaaS application.
You provide a solution or app using a free
-
to
-
try, software
-
as
-
a
-
service
(
SaaS
)
-
based trial. Free trial offers may be
presented as a limited
-
use or limited
-
duration trial account.

REQUIREMENTS DETAILS
Your app is a SaaS offering Your solution is a SaaS offering and you offer a multitenant
SaaS product.
Your app is AAD enabled The customer will be re
-
directed to your domain and you will
transact with the customer directly
SaaS Trial Technical requirements
Using Azure Active Directory to enable trials
The technical requirements for SaaS applications are simple. Publishers are only required to be integrated with
Azure Active Directory
(
Azure AD
)
to be published. Azure AD integration with applications is well documented and
Microsoft provides multiple SDKs and resources to accomplish this.
To start, we recommend that you have a subscription dedicated for your Azure Marketplace publishing, allowing
you to isolate the work from other initiatives. Once this is done you can start deploying your SaaS application in
this subscription to start the development work.
The best Azure Active Directory documentation, samples and guidance are located at the following sites:
Azure Active Directory Developer's Guide
Integrating with Azure Active Directory
Integrating Applications with Azure Active Directory
Azure Roadmap
-
Security and Identity
For video tutorials, review the following:
Azure Active Directory Authentication with Vittorio Bertocci
Azure Active Directory Identity Technical Briefing
-
Part 1 of 2
Azure Active Directory Identity Technical Briefing
-
Part 2 of 2
Building Apps with Microsoft Azure Active Directory
Microsoft Azure Videos focused on Active Directory
Free Azure Active Directory training is available at
Microsoft Azure for IT Pros Content Series: Azure Active Directory
In addition, Azure Active Directory provides a site to check for Service Updates
Azure AD Service updates|
Microsoft authenticates all Marketplace users with Azure AD, hence when an authenticated user clicks through
your Trial listing in Marketplace and is redirected to your Trial environment, you can provision the user directly into
a Trial without requiring an additional sign
-
in step. The token that your app receives from Azure AD during
authentication includes valuable user information that you can use to create a user account in your app, enabling
you to automate the provisioning experience and increase the likelihood of conversion. For more information
about the token, see Sample Tokens .
Using Azure AD to enable 1
-
click authentication to your app or Trial does the following:
Streamlines the customer experience from Marketplace to Trial.

Certifying your Azure AD integration for Marketplace
SaaS Subscriptions
REQUIREMENT DETAILS
Billing and metering Your offer is priced at a monthly flat rate. Usage
-
based pricing
and usage
-
based "true
-
up" capabilities are not supported at
this time.
Cancelation Your offer is cancelable by the customer at any time.
Transaction landing page You host an Azure co
-
branded transaction landing page where
users can create and manage their SaaS service account.
Maintains the feel of an 'in
-
product experience' even when the user is redirected from Marketplace to your
domain or Trial environment.
Decreases the likelihood of abandonment on redirect because there is not an additional sign
-
in step.
Reduces deployment barriers for the large population of Azure AD users.
You can certify your Azure AD integration in a few different ways, depending on whether your application is single
-
tenant or multi
-
tenant, and whether you are new to Azure AD federated single sign
-
on
(
SSO
)
, or already support it.
For multi
-
tenant applications:
If you already support Azure AD, do the following:
1. Register your application in the Azure portal
2. Enable the multi
-
tenancy support feature in Azure AD to get a 'one
-
click' trial experience. More specific
information can be found here.
If you are new to Azure AD Federated SSO, do the following:
1. Register your application in the Azure portal
2. Develop SSO with Azure AD using OpenID Connect or OAuth 2.0.
3. Enable multi
-
tenancy support feature in AAD to get 'one
-
click' trial experience More specific information can be
found here.
For single
-
tenant application, use any of the following options:
Add users to your directory as guest users using Azure B2B
Manually provision trials for customers by using 'Contact Me'
Develop a per
-
customer 'Test Drive'
Build a multi
-
tenant sample demo app with SSO
Use SaaS app offer type to enable your customer to buy your SaaS
-
based, technical solution as a subscription. The
following requirements must be met for your SaaS app:
Price and bill the service at a flat, monthly rate.
Provide a method to upgrade or cancel the service at any time. Microsoft hosts the commerce transaction.
Microsoft bills your customer on your behalf. To use bill a SaaS App as a subscription, you must enable you own
subscription management service API. Your subscription management service API must communicate directly
with the Azure Resource Manager APIs. Your subscription management service API must support service
provisioning, upgrading, and canceling.

Subscription API You expose a service that can interact with the SaaS
Subscription to create, update, and delete a user account and
service plan. Critical API changes must be supported within 24
hours. Non
-
critical API changes will be released periodically.
REQUIREMENT DETAILS
Next Steps
If you haven't already done so,
Register in the marketplace
If you're registered and are creating a new offer or working on an existing one,
Log in to Cloud Partner Portal to create or complete your offer
Containers Offer Publishing Guide
7/13/2018 • 2 minutes to read • Edit Online
NOTENOTE
Containers Offer
REQUIREMENT DETAILS
Billing and metering Support either the free or BYOL billing model.
Image built from Dockerfile Container images must be based on the Docker image
specification and must be built from a Dockerfile.
Hosting in ACR Container images must be hosted in an Azure Container
Registry
(
ACR
)
repository.
Image tagging Container images must contain at least 1 tag
(
maximum tags:
16
)
.
Next Steps
Container offers help you publish your container image to the Azure Marketplace. Use this guide to understand the
requirements for this offer.
These are transaction offers which are deployed and billed through the Marketplace. The call to action that a user
sees is "Get It Now."
Use the Container offer type when your solution is a Docker container image provisioned as a Kubernetes
-
based
Azure container service.
For example, a Kubernetes
-
based Azure container service like Azure Kubernetes Service or Azure Container Instances, the
choice of Azure customers for a Kubernetes
-
based container runtime.
Microsoft currently supports free and bring
-
your
-
own
-
license
(
BYOL
)
licensing models.
For more information about building docker images,
visit the Usage section located at
docs.docker.com/engine/reference/builder/#usage.
For more information about working with ACR, visit
the Quickstart: Create a container registry using the
Azure portal page located at
docs.microsoft.com/azure/container
-
registry/container
-
registry
-
get
-
started
-
portal.
For more information about tagging an image, visit the
docker tag page located at
docs.docker.com/engine/reference/commandline/tag.
If you haven't already done so,
Register in the marketplace

Azure Marketplace Consulting Services
7/10/2018 • 7 minutes to read • Edit Online
Consulting Services in Azure Marketplace vs AppSource Storefront
AZURE MARKETPLACE APPSOURCE
Audience IT Pros and Cloud Developers Business Users / Line
-
of
-
Business
decision makers
Solution Relevance Technical apps built for or built on Azure Business Apps That Leverage / Extend
D365, Power BI, O365, Azure.
(
Add
-
in
or Add
-
on finished apps
)
Publishing Options Contact me, Trial, Transact, or
Consulting Services
Contact Me, Trial, or Consulting Services
In Product Experience Azure Management Portal Dynamics 365, Office 365, Office Client
Apps
Other On
-
Premises Publishing Via Azure Stack Consulting Services for Dynamics and
Power BI
NOTENOTE
TIPTIP
Consulting Services in Azure Marketplace provides Microsoft partners the goal of connecting customers with
services to support and extend their use of Azure. The Azure Marketplace supports the listing of consulting
-
service
offerings from System Integrator
(
SI
)
partners of Microsoft.
These consulting
-
service offerings are customer
-
specific engagements. Publishers have the option to determine
the listing type and with fixed scope and duration, either fixed
-
price or free, and have a defined deliverables to the
customer. Partners receive a notification in their CRM system, and they aim to respond to requests within 48 hours.
The marketplace storefronts are aligned with audiences and Microsoft cloud products to help customers find what
they need. Each storefront offers specialized publishing options to help you maximize your publishing investment.
The following table summarizes these options:
Consulting Services in Azure Marketplace should leverage offerings geared towards a technical audience with focuses on
Azure technical solutions and services.
Service offers that are based on Microsoft Dynamics 365, Office 365, and Power BI are eligible to be listed on
AppSource. For more information, see Microsoft AppSource consulting services listing guidelines.
This information is for Azure Marketplace services only. To publish to the Azure Marketplace storefront, you will make this
selection by choosing "Azure" from the "Primary Product" drop
-
down menu in the Cloud Partner Portal. To publish to
AppSource, you will make this selection by choosing "Dynamics 365," "Power BI," or "Power Apps" from the "Primary Product"
drop
-
down menu in the Cloud Partner Portal.

Eligible Partners and Supported Countries
COMPETENCY SOLUTION AREA
Cloud Platform and Infrastructure Cloud Platform, Data Center
Application Development and ISV Application Development, Application Integration, DevOps
Data Management and Analytics Data Analytics, Data Platform
ELIGIBLE COUNTRIES
Australia Germany New Zealand
Belgium Italy Norway
Canada India Poland
Denmark Japan Sweden
Finland Mexico United Kingdom
France Netherlands United States
How To Register For Consulting Services in Azure Marketplace
NOTENOTE
Prepare Your Publishing Artifacts
Partners are also required to have a silver or gold competency in the relevant area for their service. The eligible
competencies are listed in the following table:
For more information, see competencies through Microsoft Partner Network.
SI partners can submit consulting
-
service offerings for the following 18 countries.
The launch of Azure Marketplace consulting services will go live first for Australia, Canada, the United Kingdom,
and the United States. The catalogs for other countries will go live after a meaningful number and compelling
selection of service offerings have been submitted by partners and approved by Microsoft.
Start by registering your consulting services with Azure Marketplace. Publishers can reference Become a Publisher
in the Marketplace, for a complete check
-
list of registration requirements.
What To Expect After Registration The Onboarding Team will reach out in 1
-
3 business days with a welcome
email which will include your Cloud Partner Portal
(
CPP
)
login information. Cloud Partner Portal is the offer listing
portal where publishers submit listing information and submissions.
Partners only need to register once to become a publisher. Once you receive your welcome email and Cloud Partner Portal
login, publishers do not need to re
-
register in order to publish different listing types.
Prior to registration, you can start collecting and preparing the content that will help your listing articulate the
value of your service and solution to your target customer.

SET UP FOR NEW PUBLISHERS
MPN ID
Company logos
(
48 × 48, 216 × 216
)
Lead Destination
SET UP FOR NEW OFFERS
Offer name
(
200 characters
)
and description
(
2000 characters
)
Competencies
Country/region availability
Duration of engagement
Applicable industries, categories, and search keywords
Product overview video
Screenshots
(
maximum of 5, 1280 × 720
)
Marketing documents
(
maximum of 3
)
Publishing Process
Offer Listings and Content Review Criteria
Listing your consulting
-
service offer on the Azure Marketplace involves the following stages:
1. Request: To send your request, use the Azure Marketplace Nomination Form and tell us more about your
organization. Note: Publishers will only need to submit nomination process once to list on either Azure
Marketplace or AppSource. Once nomination and onboarding process has been completed, a Cloud Partner
Portal will be created where publishers can create and submit their offer listings.
2. Validation: Your request is reviewed to ensure that you meet the eligibility criteria. We then send you
instructions for listing your consulting services offering.
3. Submit: Provide the required information that's listed in the instructions. All content and supporting material
must be submitted in English.
4. Review: Our marketing and editorial team reviews your submission and optimizes it for readability, grammar,
and effectiveness.
5. Staging: Your submission is staged for your review.
6. Publishing: When you and Microsoft are satisfied with the staged content, your listing is ready to go live on the
Azure Marketplace. The go
-
live date for your listing depends on the country that's specified in your offering. If
the catalog for your selected country is already live on the Azure Marketplace, your listing will appear within a
few hours. Otherwise, the listing will appear as soon as the catalog goes live.
Offerings must be of one of the following five service types
(
you can list more than one
)
:
Assessment: An evaluation of a customer’s environment to determine the applicability of a solution and
provide an estimate of cost and timing.

Listing TitleListing Title
SAMPLE TITLE CORRECT FORMAT
Getting Started with Azure IoT in Manufacturing Manufacturing IoT: 2
-
Day Assessment
Workshop on Smart Toasters Smart Toasters: 1
-
Wk Workshop
SQL Server Migration PoC SQL Migration: 3
-
Wk Proof of Concept
Listing Summaries and DescriptionsListing Summaries and Descriptions
OFFER T YPE REQUIRED RECOMMENDED
Assessment Include a detailed agenda for multi
-
day
or multi
-
week assessments, and
articulate what deliverable the customer
can expect
Optimize your offer summary with your
top Search Engine Optimization
keywords
Briefing Articulate what deliverable the
customer can expect. Please remember
that Briefings must also be offered in
person. If you are providing a virtual
service, please choose a different offer
type
Optimize your offer summary with your
top Search Engine Optimization
keywords
Implementation Include a detailed agenda for multi
-
day
or multi
-
week implementations, and
articulate what engineering changes,
technical artifacts, or other artifacts a
customer can expect as outcomes of the
engagement
Optimize your offer summary with your
top Search Engine Optimization
keywords
Briefing: An introduction to a solution or a consulting service to draw customer interest by using frameworks,
demos, and customer examples.
Implementation: A complete installation that results in a fully working solution. We recommend limiting it to
solutions that can be implemented in two weeks or less.
Proof of concept: A limited
-
scope implementation to determine whether a solution meets customer
requirements.
Workshop: An interactive engagement that's conducted on a customer’s premises. It can involve training,
briefings, assessments, or demos that are built on the customer’s data or environment.
Note: Except for the Briefing service type, consulting services can be offered in
-
person
(
that is, onsite at a
customer’s location or a partner’s facility
)
or virtually
(
that is, via teleconferencing, web conferencing, or remote
implementation
)
. Briefings must be offered in person.
Once you have configured the required elements listed above, the content review team will validate that your offer
description is informative and complete for your target audience.
Note that the title field has a 50
-
character limit and must transmit the duration and service type of the offer. This is
to maximize search engine optimization. The required format is as follows: NAME : DURATION TYPE
Examples:
When reviewing Offer Descriptions and Offer Summaries, the team will apply the following criteria:

Proof of Concept Articulate what engineering changes,
technical artifacts, or other artifacts a
customer can expect as outcomes of the
engagement
Optimize your offer summary with your
top Search Engine Optimization
keywords
Workshop Include a detailed agenda daily, weekly,
or monthly, depending on the chosen
duration of your offering. Articulate
what the learning goals or other
deliverables are of your workshop
Optimize your offer summary with your
top Search Engine optimization
keywords
OFFER T YPE REQUIRED RECOMMENDED
Within Cloud Partner Portal, you can add formatting to your listing by using Markdown. This is a lightweight
design language that will help add polish to your listing.
Sample Markdown Notes
Add * at beginning and end of copy block
-
with no space to create italics
(
Ex: content
)
Include line break after ":" colon
Space after "*" for bullets
(
Ex: *
(
space
)
Content
)
### space for heading
(
Ex: ###
(
space
)
Agenda/Deliverables
)
Line break after heading
** = bold
(
No space
)
(
Ex: No Space
)
• Italicize Offer Summary • Agenda and Deliverables is a Heading

Office 365, Dynamics 365, Power Apps and Power BI
Offer Publishing Guide
7/13/2018 • 2 minutes to read • Edit Online
Product
-
Specific guides
Office 365Office 365
Power AppsPower Apps
Power BIPower BI
Dynamics 365Dynamics 365
Dynamics 365 for Finance and OperationsDynamics 365 for Finance and Operations
Dynamics 365 for Customer EngagementDynamics 365 for Customer Engagement
Next Steps
The AppSource storefront includes offers that build on or extend Dynamics 365, Office 365, Power BI, and Power
Apps. Each of these products have specific documentation to guide you in the publishing process. See below for
links to more detail for each offer type.
AppSource has list and trial offers, with the call to action "Contact Me" or "Try It Now." There is currently no
transaction functionality in AppSource.
Review the publishing process and guidelines
Learn about how customers can test drive your app on AppSource.
Review the publishing process and guidelines.
When building for Enterprise Edition, review the publishing process and guidelines
Review the publishing process and guidelines
If you haven't already done so,
Register in the marketplace
If you are registered and working in Cloud Partner Portal,
Log in to Cloud Partner Portal to create or complete your offer
Enable a trial listing by using Azure Active Directory
7/19/2018 • 2 minutes to read • Edit Online
Verify your Azure AD integration in the Marketplace: Multitenant apps
Verify your Azure AD integration in the Marketplace: Single
-
tenant
apps
Azure Active Directory
(
Azure AD
)
is a cloud identity service that enables authentication with a Microsoft work or
school account by using industry
-
standard frameworks. Azure AD supports OAuth and OpenID Connect
authentication. The Azure Marketplace uses Azure AD to authenticate you and your customers.
For more information about Azure AD, see Azure Active Directory.
After a customer selects your trial listing in the Marketplace, your customer is redirected to your trial environment.
In your trial environment, you can set up your customer directly without requiring additional sign
-
in steps. Your
app or offer receives a token from Azure AD during authentication. The token includes valuable user information
that's used to create a user account in your app or offer. You can automate customer setup and increase the
likelihood of conversion.
For more information about the token that's sent from Azure AD during authentication, see Sample tokens.
Use Azure AD to enable one
-
click authentication in your app or trial. Azure AD gives you the following benefits:
Streamline the customer experience from the Marketplace to trial.
Maintain the feel of an in
-
product experience, even when the user is redirected from the Marketplace to your
domain or trial environment.
Reduce the likelihood of abandonment upon redirect, because there are no additional sign
-
in steps.
Reduce deployment barriers for the large population of Azure AD users.
Use Azure AD to support the following options for your solution:
Register your app in storefronts in the Marketplace.
Enable the multitenancy support feature in Azure AD to get a one
-
click trial experience.
For more information about app registration, see Integrating applications with Azure Active Directory.
If you are new to using Azure AD federated single sign
-
on
(
SSO
)
, complete these steps:
1. Register your app in the Marketplace.
2. Develop SSO with Azure AD by using OAuth 2.0 or OpenID Connect.
For more information about OAuth 2.0, see OAuth 2.0.
For more information about Open ID Connect, see OpenID Connect.
3. Enable the multitenancy support feature in Azure AD to provide a one
-
click trial experience.
For more information about AppSource certification, see AppSource certification.
Use Azure AD to support one of the following options for your single
-
tenant solution:
Add users to your directory as guest users by using Azure Active Directory B2B
(
Azure AD B2B
)
.
For more information about Azure AD B2B, see What is Azure AD B2B collaboration.


Grow your business on marketplace
7/19/2018 • 25 minutes to read • Edit Online
App listing best practices
Offer identityOffer identity
Storefront details > Offer detailsStorefront details > Offer details
STOREFRONT SETTINGS BEST PRACTICES
Offer Name Provide a strong title:
Your app name should communicate the core value customers
receive. Including search keywords in your app title can also
help your app to be ranked higher in search engine results.
Consulting service listings should follow a set title format:
[
Offer Name
]
:
[
Duration
]
[
Offer Type
]
, e.g. Contoso: 2
-
Week
Implementation
Adhere to brand guidelines:
Please follow the Microsoft Trademark and Brand Guidelines as
well as relevant product
-
specific guidelines when referring to
Microsoft trademarks and the names of Microsoft, software,
products, and services.
For more information about Microsoft trademarks and
branding, visit the Microsoft Trademark and Brand Guidelines
page.
Offer Description Provide a good offer description
Clearly describe the value proposition of your offer in the first
few sentences of your description. Keep in mind that the first
few sentences might be displayed in search engine results. Do
not rely on features and functionality to sell your product.
Instead, focus on the value you deliver. Use industry
-
specific
vocabulary or benefit
-
based wording as much as possible.
Core components of your value proposition should include the
following information:
-
Description of the product
-
Type of user who will benefit
-
Customer need or pain does it addresses
Storefront details > Listing detailsStorefront details > Listing details
STOREFRONT SETTINGS BEST PRACTICES
After you have published your offer on AppSource or Azure Marketplace, you can use your listing as a launchpad
for joint go
-
to
-
market
(
GTM
)
activities with Microsoft. Driving traffic to your marketplace offer and nurturing
marketplace leads, for example, are great ways to accelerate your business growth. In this article, we will share
many marketing best practices to grow your business on marketplace.
The following tables provide suggestions on creating an engaging marketplace offer. You will use the Cloud Partner
Portal to write and configure these marketing materials.

Industries: AppSource apps and consulting services only Select industries if your offer addresses industry
-
specific
requirements. Make sure to call out these industry
-
specific
capabilities in your offer’s description.
Note: the maximum number of options varies by offer type
and will be indicated in the Cloud Partner Portal.
Categories Select categories that align best with your offer. Choose these
categories carefully as customers use the categories to search
for relevant apps. Make sure to call out how your offer
supports category
-
specific needs in the offer description.
Note: the maximum number of options varies by offer type
and will be indicated in the Cloud Partner Portal.
Products your app works with
(
max 3
)
: AppSource apps only List additional products and technologies that your solution
uses or extends, e.g. Azure IOT Hub, Azure Machine Learning,
etc.
Search keywords
(
max 3
)
Search keywords help business users find your offer when
searching in Azure Marketplace and AppSource or by using
search engines. Identity the top three search keywords for
your offer; incorporate the search keywords in your offer
summary, description; and list the search keywords here.
STOREFRONT SETTINGS BEST PRACTICES
Storefront details > Marketing artifactsStorefront details > Marketing artifacts
STOREFRONT SETTINGS BEST PRACTICES
Offer logo
(
.png format, 48x48
)
Your logo should be designed and optimized for a digital
medium. Upload logo in PNG format for the search page of
your offer.
Offer logo
(
.png. 216 x 216
)
Your logo should be designed and optimized for a digital
medium. Upload logo in PNG format for the app details listing
page of your offer.
Learn more/Documents Include supporting sales and marketing assets under “Learn
more,” e.g., white papers, brochures, checklists, PowerPoints,
etc. All files should be in PDF format. Your goal with these
documents should be to educate customers, not sell them.
Add the link to your app landing page to all your documents
and add URL parameters to help you track visitors and trials.
Videos: AppSource, consulting services, and SaaS offers only The strongest videos communicate the value of your offer in
narrative form. Make the customer the hero of the story, not
your company. Your video should speak to the principal
challenges and goals of your target customer.
Recommended length: 60
-
90 seconds.
Incorporate key search words in the name of the videos.
Consider adding additional videos, such as a how
-
to, getting
started video, or customer testimonial video.

Screenshots
(
1280x720
)
Add up to five screenshots; incorporate key search words in
the names.
STOREFRONT SETTINGS BEST PRACTICES
Marketing Best Practices
To help you maximize the benefit of listing on marketplace, we collected the following best practices for marketing
your offers on AppSource and Azure Marketplace. First, be sure to review the marketing best practices and
resources on The Microsoft Partner Network
(
MPN
)
. This is your gateway for all marketing and programmatic
resources related to partnering with Microsoft.
In addition, the quality of your marketplace offer and your commitment to customer
-
centric demand generation
help drive growth for your business. Engaging in these activities helps Microsoft amplify your go
-
to
-
market work
and feature key solutions across the storefronts on the marketplace.
Once you’ve created a great listing, the following marketing initiatives will help you grow your business:
Build a strong value proposition.
Identify who your potential customer is and the key differentiators of your solution.
Create a unique landing page on your site to make your app listing stand out.
Drive traffic from there to your offer and make a great first impression. Based on your offer listing,
customers decide if they want to learn more and try your solutions.
Enable a test drive or other trial experience.
Users want to experience your app first hand. Publishers have historically seen much higher lead conversion
from a listing with a test driver or trial.
Optimize your listing to help boost search engine rankings.
Incorporate search keywords in your app name, summary and listing, and include search keywords in the
three search keywords.
Enable lead sharing.
Receive the contact information of your customer when they try your app right in your CRM system. Make
sure you have a process in place to follow up on these leads.
Build your demand generation plan.
Use your marketplace offer listing as the landing page for marketing calls
-
to
-
action. Once on your offer’s
marketplace listing, every time a customer trials, test drives, or deploy your offer, you receive their name and
contact information if you have enabled lead sharing.
Promote your app on AppSource and/or Azure Marketplace.
Link to your app listing and use URL tagging every time you link to your app.
Create marketing and promotion campaigns.
Plan and build campaigns drive awareness and engagement with a clear call
-
to
-
action that directs traffic to
your marketplace listing.
Get customer feedback.
Remind your customers to submit a rating and review. Users receive an email to share the experience of
your customers after they started a trial.
Get actionable insights.
View the Insights dashboard in the Cloud Partner Portal. Track how many visitors your app listing gets, and
how many try your app. Learn details about the performance of your marketing campaigns and which

Build an effective marketing campaign
Know your audienceKnow your audience
Define where your audience learnsDefine where your audience learns
Create clear campaign goalsCreate clear campaign goals
content performs best.
Use Go
-
To
-
Market services benefits.
Take full advantage of our Go
-
To
-
Market services. Learn more about benefits available through the
Microsoft Partner Network
(
MPN
)
.
A marketing campaign is a series of promotional activities or marketing tactics aimed at driving your audience to a
desired action or outcome. Before you design your campaign, considering the following best practices:
First, determine the actual buyer versus the purchase influencer. They may be different people within an
organization, and your tactics and calls
-
to
-
action for each group may differ. Ask these evaluation questions to help
you better understand your audience:
How much control does the buyer have over the purchasing decision?
How much influence does the influencer have?
What does the influencer influence?
Do they influence budget or which solution is picked?
Knowing the answers to these questions helps you make decisions about where to invest your sales and marketing
resources.
These days typical customers are most of the way through their journey by the time they visit a marketplace.
Buyers get this far in the decision
-
making process by learning about solutions and assessing options in advance.
You want to design a campaign that aims to be where your buyers and influencers learn about solutions well
before they consider purchasing one.
Every audience for each industry, vertical, or category is different. Does your audience learn online, through email,
at trade shows, through social media, or through conversations with trusted advisors? Depending on where and
how your audience learns, you should design activities and distribute your marketing dollars accordingly. The
combination of these tactics becomes your campaign strategy.
You should define success for your campaign on the marketplace and create clear key performance indicators
(
KPIs
)
. You may run multiple campaigns with different end goals, of course. The ultimate end
-
goal is typically
increased revenue or customer acquisition; however, your marketing campaigns might be tied to goals at other
stages of the buying cycle. Here are a few examples:
You have newly launched your product in the marketplace. In this case, you might find that your marketing
resources are best spent on audience education and lead generation. Success might be defined by the number
of leads generated from your marketplace listing. In this case, your marketing tactics
(
and landing page
)
would
focus on drawing customers to your marketplace listing.
You have a trial set up in the marketplace and your product requires some level of engagement and experience
before purchase. Consider a campaign goal of the number of trials downloaded. In this case, the call
-
to
-
action
for your campaign tactics would focus sharply on encouraging a trial in the marketplace.
Your product or category is well known, and you have purchase capabilities set up in the marketplace. Consider
skipping the trial call
-
to
-
action and direct your audience to your "Get It Now" link in the marketplace.
Your offer is established and mature. Consider focusing your campaign efforts on upselling your customer base
and driving action toward increased purchase in the marketplace. Your messaging would focus on encouraging
customers to purchase through the marketplace. Your KPI could be the revenue generated through the
marketplace.

Invest in merchandisingInvest in merchandising
Merchandising BadgeMerchandising Badge
Linking to your app listing page on marketplace from your websiteLinking to your app listing page on marketplace from your website
Whatever the maturity of your offer and the goals of your organization, the following are keys to maximizing the
effectiveness of your campaign:
Remain focused on its goal
(
s
)
Map out a set of integrated marketing tactics aligned to this goal
As part of being a new publisher on marketplace, Microsoft offers you some free marketplace go
-
to
-
market
benefits. You should think critically about how to use these benefits in your campaign strategy. Let our marketing
team know your marketplace campaign goals and your desired audience action. Microsoft may customize these
deliverables to work into your plan.
Be sure to engage in the Smart Partner Marketing program, a benefit of joining the Microsoft Partner Network, for
additional content on campaign building and marketing practices
As part of the publishing process, you should consider what type of offer to create and choose a category for your
offer in AppSource or Azure Marketplace. Make sure you select a category that is accurate for your solution so that
it is displayed accurately to potential customers.
Marketplace featured offers are chosen based on which offers provide the best customer experience and take
advantage of high
-
quality partner marketing engagement. The following criteria increases the chance of your
solution be part of marketplace featured offers:
Clarity of the listing
Quality of the solution
Reliability of the technology
Growth of platform usage by your customers
Your level of engagement with creating high
-
quality marketing material
To maximize the chances that your offer is featured, you should invest in the success of your marketplace offering.
Consider the following approaches to ensure a great customer experience for your offer:
Ensure that your marketing artifacts are uploaded and displaying correctly.
Drive high
-
quality traffic to your offer in marketplace by creating high
-
quality demand generation campaigns.
Grow the consumption of your AppSource or Azure Marketplace offers by driving demand, providing high
-
quality customer service, and providing timely updates on your offer.
For more information about how featured offers fit in the context of your go
-
to
-
market benefits, visit the GTM
Benefits on the marketplace page.
When your offer is listed on AppSource or Azure Marketplace, you have earned the benefit of displaying the
Available on AppSource or Available on Azure Marketplace badge on your website.
The AppSource badge is available in three sizes. You can download the badge along with guidance on how to use it
at Promote the availability of your app on Microsoft AppSource.
The Azure Marketplace badge is provided as part of your free go
-
to
-
market benefits.
When you link from the AppSource or Azure Marketplace badge on your site to your listing on marketplace,
include the following query parameters at the end of the URL to support strong analytics and reporting:
src
Include the source from where the traffic is routed to AppSource, e.g. website, LinkedIn, Facebook, etc.

Analytics and Reporting
Enable Lead Sharing
mktcmpid
Your marketing campaign ID, which can include up to 16 characters using any combination of letter, number,
underscore, and hyphen, e.g. blogpost_12 The following example shows a URL that includes the two query
parameters. Adding the parameters to your AppSource URL enables you to review the effectiveness of your
campaign in the analytics dashboard in the Cloud Partner Portal:
https://appsource.microsoft.com/product/dynamics
-
365/mscrm.04931187
-
431c
-
415d
-
8777
-
f7f482ba8095?
src=website&mktcmpid=blogpost_12
In the Insights section of the Cloud Partner Portal, you see a high
-
level performance overview for your offer. The
best practice for the information in these reports is to reconcile it with your internal data. Use it to help prioritize
your marketing campaign actions.
The Analytics section of Cloud Partner Portal
(
currently in preview and available only for AppSource offers
)
provides a rich Power BI dashboard. You can use the dashboard to see traffic on the detail page of your offer. New
features for this dashboard are rolled out in an ongoing way.
Also, in the Cloud Partner Portal is documentation on Microsoft campaigns. You may use the Microsoft campaigns
documentation to set up and track your campaign.
The following reports are included in the high
-
level performance overview section:
Summary snapshot of orders
Usage
Deployments
Customer trends on the Insights home page
Detailed orders, usage, and customer data
Orders and usage shown as a monthly summary or as a six
-
month trend view
Usage and orders sliced by several criteria
Detailed reports display customer information, such as company name and geographic location at the postal code
level. Consider using this information to compare your customers or compensate your sellers. Microsoft provides
the following specific attributes about your customers:
Reseller
First Name
Last Name
Email
Company Name
Transaction Date
Subscription Name
Azure Subscription ID
(
pay
-
as
-
you
-
go customers only
)
Cloud Instance Name
Order Count
Customer Country Region
Customer City
Customer Communication Culture
Customer Zip Code
Nurturing leads from marketplace is a key enabler for successful engagement with marketplace users. Start by

GTM Benefits on the Marketplace
STOREFRONT ADDITIONAL BENEFITS AVAILABLE
AppSource
Microsoft Gold partners
Trial apps
Azure Marketplace
Transact offers
Trial offers
Promote Your Business with Microsoft
ensuring that lead management is enabled for your listing and configured correctly in your company CRM system
of choice, so that you receive the signals and contact information for the users interacting with your listing in a
queue to be processed for qualification. Use the following practices for your leads:
Enrich marketplace leads with additional data from your marketing and sales databases. A marketplace
customer may already be in one of your lead nurture systems due to a prior marketing campaign or as an
existent customer.
Score leads and use different nurture paths for different actions on marketplace. A customer testing your
application is in a different stage than someone initiating a purchase, for example.
Process leads data frequently. Recency of engagement with customers is a key driver for success.
Nurturing your leads via email or inside/pre
-
sales to ensure proper qualification before entering a sales
pipeline.
Align your efforts with your overall marketing campaign strategy. For more information about how to access
the Co
-
Sell program, visit the Promote Your Business with Microsoft page.
New listings in the storefronts on the marketplace are eligible to receive free Marketplace GTM benefits. After
listing, marketing specialists at Microsoft contact you or your marketing contact to kick
-
start the activities. There is
nothing for you to do except to engage with Microsoft when you are contacted.
The activities that Microsoft provides differ depending on your solution status on the marketplace. Benefits
significantly increase for listings.
To maximize the impact of these activities, Microsoft encourages you to have your launch plan ready to implement.
You might want to use your landing page for many of your launch tactics.
Your go
-
to
-
market support includes templates, web content, training, and tools to promote your business.
For more information about go
-
to
-
market support, visit Microsoft Go
-
To
-
Market Services.
Microsoft has the goal to support publishers like you and simplify selling your app or offer in the storefronts on the
marketplace. By listing on the marketplace, you access additional, free marketing and sales programs and
resources.
If you have not already signed up to the Microsoft Partner Network
(
MPN
)
, then this sign before continuing.
For more information about MPN, visit the Microsoft Partner Network page located at partner.microsoft.com.
MPN provides guidance on the following topics.

BENEFITS RESOURCES
Use your Core Benefits As part of the Microsoft Partner Network, you receive a set of
core benefits that may help you save time and money. The
benefits may also help you strengthen your capabilities, better
serve customers, and build connections to reach your full
business potential.
For more information about core benefits, visit Core Benefits
and Requirements.
Earn your Cloud Platform Competency Earning a competency helps you differentiate yourself among
other Microsoft partners. Earning a competency also helps
you demonstrate technical expertise and customer success in
the market. Competency is a prerequisite for many key
partner programs like Co
-
Sell.
For more information about Cloud Platform competency, visit
Cloud Platform Competency.
Become IP Co
-
Sell Ready You may be eligible for the IP Co
-
Sell Ready program, which
allows you to collaborate directly with Microsoft sellers and
other partners on target customer opportunities and account
planning. Your solution becomes visible to Microsoft sellers in
the seller solution catalog. Microsoft sellers are rewarded for
collaborating and winning with you.
For more information about Co
-
Sell readiness, including
eligibility requirements, visit Promote Your Business.
Azure Partner Customer Usage Attribution
New business opportunities
Connecting with teams or partners
Solutions and training to help grow your skillset
To promote your offer or app, use the following table to access more benefits and resources:
As a software partner for Azure your solutions either require Azure components or is deployed directly on Azure
infrastructure. Today, when an partner solution is deployed by the customer and uses Azure resources provisioned
by the customer, it is difficult for the partner to gain visibility to the status of those deployments and difficult to get
optics into impact to Azure growth for alignment with the Microsoft sales teams and credit for Microsoft partner
programs.
Microsoft is creating a new method to help partners better track Azure usage that is a result of a customer
deploying your software on Azure. This new method is based on using Azure Resource Manager to orchestrate
deployment of Azure services.
As a Microsoft partner, you can associate Azure usage with any Azure resources you provision on a customer's
behalf. This can be done via the Azure Marketplace, the QuickStart repo, private github repos and even 1 on 1
customer engagements. To enable this, there are two approaches available:
1. Azure Resource Manager Templates: Azure Resource Manager templates or solution templates to deploy
the Azure services to run the partner’s software. Partners can create Azure Resource Manager template that
defines the infrastructure and configuration of your Azure solution. Creating an Azure Resource Manager
template allows you and your customers repeatedly deploy your solution throughout its lifecycle and have
confidence your resources are deployed in a consistent state.
2. Azure Resource Manager APIs: partners can call the Azure Resource Manager APIs directly to either deploy
an Azure Resource Manager template or to generate the API calls to directly provision Azure services.

Method 1: Azure Resource Manager Templates
Instructions: add a GUID to your existing Azure Resource Manager
template
Sample Template Code
{ // add this resource to the mainTemplate.json (do not add the entire file)
"apiVersion": "2018-02-01",
"name": "pid-XXXXXXXX-XXXX-XXXX-XXXX-XXXXXXXXXXXX", // use your GUID here
"type": "Microsoft.Resources/deployments",
"properties": {
"mode": "Incremental",
"template": {
"$schema": "https://schema.management.azure.com/schemas/2015-01-01/deploymentTemplate.json#",
"contentVersion": "1.0.0.0",
"resources": []
}
}
} // remove all comments from the file when done
Method 2: Azure Resource Manager APIs
Today many partner solutions are deployed on a customer’s subscription using Azure Resource Manager
templates. If you already have a Azure Resource Manager template available in the Azure Marketplace, on GitHub
or as a QuickStart, the process of modifying your template to enable this new tracking method should be straight
forward. If you are not using an Azure Resource Manager template today here are a few links to help you better
understand Azure Resource Manager templates and how to create one:
Create and deploy your first Azure Resource Manager template
Guide to create a solution template for Azure Marketplace
Adding the GUID is a single modification of the main template file:
1. Create a GUID, let's say that the generated value is eb7927c8
-
dd66
-
43e1
-
b0cf
-
c346a422063
2. Open the Azure Resource Manager template
3. Add a new resource in the main template file. The resource only needs to be in the mainTemplate.json or
azuredeploy.json, not in any nested or linked templates.
6. Republish the template in the appropriate repositories
4. Enter the GUID after the “pid
-
” as shown above.
It should look something like this example: pid-eb7927c8-dd66-43e1-b0cf-c346a422063
5. Check template for any errors
In some cases, partners prefer to make calls directly against the Azure Resource Manager REST APIs to deploy
Azure services. Azure supports multiple SDKs to enable this. You can use one of the SDKs, or call the REST APIs
directly to deploy resources.
If you are using an Azure Resource Manager template, you should tag your solution using the instructions above. If
you are not using an Azure Resource Manager template and making direct API calls you can still tag your
deployment to associate usage of Azure resources.
How to tag a deployment using the Azure Resource Manager APIs: For this approach, when designing your
API calls you will include a GUID in the user agent header in the request. The GUID should be added for each
NOTENOTE
client = azure.mgmt.servicebus.ServiceBusManagementClient(**parameters)
client.config.add_user_agent("pid-eb7927c8-dd66-43e1-b0cf-c346a422063")
[Microsoft.Azure.Common.Authentication.AzureSession]::ClientFactory.AddUserAgent("pid-eb7927c8-dd66-43e1-b0cf-
c346a422063")
export AZURE_HTTP_USER_AGENT='pid-eb7927c8-dd66-43e1-b0cf-c346a422063'
Registering GUIDs/Offers
Offer or SKU. The string will need to be formatted with the prefix pid
-
and then include the partner generated
GUID.
GUID format for insertion into the user agent: pid
-
eb7927c8
-
dd66
-
43e1
-
b0cf
-
c346a422063 // enter your GUID after the
“pid
-
“
The format of the string is important. If the prefix “pid
-
” is not included we will not be able to query the data.
Different SDKs do this differently. To implement this method you will need to review the support and approach for
your preferred Azure SDK.
Example using the Python SDK: For Python, you need to use the “config” attribute. You can only add to a
UserAgent
(
we still want some kind of control
)
. This would be:
This has to be done for each client, there is no global static configuration
(
You may choose to do a client factory
to be sure every client is doing it. Additional reference information
How to tag a deployment using the Azure PowerShell or the Azure CLI: If you deploy resources via
AzurePowerShell you can append your GUID by using the following method:
To append your GUID when using the Azure CLI, set the AZURE_HTTP_USER_AGENT environment variable. You
can set this within the scope of a script or to set globally, for shell scope use:
In order for the GUID to be included in our tracking it must be registered.
All registrations for template GUIDs will be done via the Azure Marketplace Cloud Partner Portal
(
CPP
)
.
Apply to Azure Marketplace today and get access to the Cloud Partner portal.
Partners will be required to have a profile in CPP and encouraged to list the offer in Azure Marketplace or
AppSource
Partners will be able to register multiple GUIDs
Partners will also be able to register a GUID for the non
-
Marketplace solution templates/offers
Once you have added the GUID to your template or in the user agent and registered the GUID in the CPP all
deployments will be tracked.

Verification of GUID Deployment
Param(
[GUID][Parameter(Mandatory=$true)]$guid,
[string][Parameter(Mandatory=$true)]$resourceGroupName'
)
#get the correlationId of the pid deployment
$correlationId = (Get-AzureRmResourceGroupDeployment -ResourceGroupName
$resourceGroupName -Name "pid-$guid").correlationId
#find all deployments with that correlationId
$deployments = Get-AzureRmResourceGroupDeployment -ResourceGroupName $resourceGroupName | Where-
Object{$_.correlationId -eq $correlationId}
#find all deploymentOperations in a deployment by name (since PowerShell does not surface outputResources on
the deployment or correlationId on the deploymentOperation)
foreach ($deployment in $deployments){
#get deploymentOperations by deploymentName and then the resourceId for any create operation
($deployment | Get-AzureRmResourceGroupDeploymentOperation | Where-Object{$_.properties.provisioningOperation -
eq "Create" -and $_.properties.targetResource.resourceType -ne
"Microsoft.Resources/deployments"}).properties.targetResource.id
}
Guidance on creating GUIDS
After you have modified your template and performed a test deployment, you can use the following PowerShell
script to retrieve the resrouces that were deployed and tagged.
You can use it to verify if the GUID has been added to your Azure Resource Manager template successfully. It does
not apply to Azure Resource Manager API deployment.
Log in to Azure and select the subscription that contains the deployment you want to verify before running the
script. It must be run within the subscription context of the deployment.
The GUID and resourceGroup name of the deployment are required params.
You can find the original script here.
A GUID
(
globally unique identifier
)
is a 32 hexadecimal digit unique reference number. To create a GUID a partner
should use a GUID generator to create their GUIDs for tracking. There are multiple online GUID generators you
can use.
Partners are encouraged to create a unique GUID for every Offer and distribution channel. For example, a partner
who has two solutions and both are deployed via a template and are available in both the Azure Marketplace and
on GitHub. The partner should create 4 GUIDS:
Offer A in Azure Marketplace
Offer A on GitHub
Offer B in Azure Marketplace
Offer B on GitHub
Reporting will be done by partner
(
Microsoft Partner ID
)
and GUID.
Guidance on privacy and data collection
Support
IMPORTANTIMPORTANT
FAQs
You can also choose to track GUIDs at a more granular level i.e. SKU
(
where SKUs are variants of an offer
)
.
Partners should provide messaging to inform their customers that deployments that include the Azure Resource
Manager GUID tracking will allow Microsoft to report the Azure usage associated with those deployments to the
partner. Some example language is below. In addition, partners should ensure this aligns with their own data
privacy and collection policies including options for customers to be excluded from track:
For Azure Resource Manager template deployments
When deploying this template Microsoft will be able identify the installation of our
[
insert partner software name
]
software with the Azure resources deployed. Microsoft will be able to correlate the Azure resources used to
support the software. Microsoft collects this information to provide the best experiences with their products and to
operate their business. This data will be collected and governed by Microsoft’s privacy policies, which can be found
at https://www.microsoft.com/en
-
us/trustcenter.
For SDK or API deployments
When deploying our software Microsoft will be able identify the installation of our
[
insert partner software name
]
software with the Azure resources deployed. Microsoft will be able to correlate the Azure resources used to
support the software. Microsoft collects this information to provide the best experiences with their products and to
operate their business. This data will be collected and governed by Microsoft’s privacy policies, which can be found
at https://www.microsoft.com/en
-
us/trustcenter.
For assistance, please follow the below steps:
1. Visit the support page located at go.microsoft.com/fwlink/?linkid=844975
2. For issues with usage association
-
select Problem type: Marketplace Onboarding and Category: Other and
then click Start Request. >
[
!Note
]
>For issues on accessing Azure Marketplace Cloud Partner Portal
-
select
Problem type: Marketplace Onboarding and Category: Access Problem and then click Start Request.
3. Complete the required fields on the next page and click Continue.
4. Complete the free text fields on the next page.
Fill in Incident title with “ISV Usage Tracking” and describe your issue in detail in the large free text field after. Complete the
rest of the form and click Submit.
What is the benefit of adding the GUID to the template?
Microsoft will provide partners with a view of customer deployments of their templates and insights on their
influenced usage. Both Microsoft and the partner can also use this information to drive closer engagement
between partners and the Microsoft sales teams and a more consistent view of an individual partner’s impact on
Azure growth.
Who can add a GUID to a template?
The tracking resource is intended to connect the partner’s solution to the customers Azure usage. The usage data is
tied to a partner’s Microsoft Partner Network identity
(
MPN ID
)
and reporting will be available to partners in the
Cloud Partner Portal
(
CPP
)
.

Next steps
Once a GUID has been added can it be changed?
Yes, a customer or implementation partner may customize the template and could change or remove the GUID.
We suggest that partners proactively describe the role of the resource and GUID to their customers and partners
to prevent removal or edits to the tracking GUID. Note that changing the GUID will only affect new, not existing,
deployments and resources.
When will reporting be available?
A beta version of reporting should be available soon. Reporting will be integrated into the Cloud Partner Portal
(
CPP
)
.
Can I track templates deployed from a non
-
Microsoft repository like GitHub?
Yes, as long as the GUID is present when the template is deployed, usage will be tracked.
Partners is required to have a profile in Cloud Partner Portal to register the related templates published outside of
the Azure Marketplace.
Is there a difference if the template is deployed from Azure Marketplace versus other repositories like
GitHub?
Yes, partner who publish offers in the Azure Marketplace may receive more detailed data on deployments from the
Azure Marketplace. Partners will benefit from exposing their offer to customers on the Azure Marketplace portal
and in the Azure management portal. Offers in the Azure marketplace also generate leads for the partner.
What if I create a custom template for an individual customer engagement?
You are still welcome to add the GUID to the template. If you use an existing GUID that was registered it will be
included in reporting. If you create a new GUID you will need to register the new GUID to get it included in
tracking.
Does the customer receive reporting as well?
Customers are currently able to track their usage of individual resources or customer defined resource groups
within the Azure management portal.
Is this similar to the Digital Partner of Record
(
DPOR
)
?
This new method of connecting the deployment and usage to a partner’s solution is intended to provide a
mechanism to link a partner solution to Azure usage. DPOR is intended to associate a consulting
(
Systems
Integrator
)
or management
(
Managed Service Provider
)
partner with a customer’s Azure subscription.
Visit Go to Market Services to learn more about Marketplace services.

Preferred Solutions in Azure Marketplace and
AppSource
7/23/2018 • 2 minutes to read • Edit Online
A Microsoft preferred solution is a cloud application selected for its quality, performance, and ability to address
customer needs in a certain industry vertical or solution area. A team of Microsoft industry and sales experts
selects solutions from Microsoft Partner Network Gold membership partners. These solutions are featured in our
cloud marketplace storefronts: Azure Marketplace and AppSource. Preferred solutions on AppSource can be
discovered by industry verticals, while on Azure Marketplace you can click within solution area categories
Microsoft will contact solution providers if one or more of their solutions has been selected as a preferred solution.
Support for Azure Marketplace
7/10/2018 • 2 minutes to read • Edit Online
Onboarding
Publishing
SUPPORT CHANNEL DESCRIPTION AVAILABILIT Y
Email: azurecertified@microsoft.com Support Azure Marketplace publishing
apps for you.
Business hours are in the Pacific time
zone.
Email: amp
-
testdrive@microsoft.com Onboarding access to test drives. Business hours are in the Pacific time
zone.
Cloud Partner Portal
SUPPORT CHANNEL DESCRIPTION AVAILABILIT Y
Support Support for Cloud Partner Portal. Support is provided at all times during
the day and night.
Technical
SUPPORT CHANNEL DESCRIPTION
Slack: join.marketplace.azure.com Slack environment to support Partners with technical issues.
There about 350+ Partners currently working in this
environment.
MSDN forums: Marketplace located at
social.msdn.microsoft.com/Forums/azure/home?
forum=DataMarket
Microsoft Developer Network forum.
The support options for Azure Marketplace.
Open a ticket for "Marketplace Onboarding" with Microsoft support to solve all issues with getting started.
For assistance, visit the Create
an incident page located at
go.microsoft.com/fwlink/?
linkid=844975

Stack Overflow: Azure located at
stackoverflow.com/questions/tagged/azure
Stack Overflow environment to get solutions and ask
questions about everything related to Azure Marketplace.
SUPPORT CHANNEL DESCRIPTION
Marketing resources
SUPPORT CHANNEL DESCRIPTION AVAILABILIT Y
Email: cosell@microsoft.com Support for onboarding processes and
questions related to the Co
-
Sell
program.
Based in the Pacific time zone.
Email: gtm@microsoft.com Support for GTM benefits and program
questions.
Business hours are in the Pacific time
zone.
Email: cebrand@microsoft.com Answers to questions about usage for
Azure logos and branding.
Support for AppSource
Technical
SUPPORT CHANNEL DESCRIPTION
Email: appsourcecrm@Microsoft.com Support publishing Dynamics Apps for you
Next steps
Stack Overflow: Azure Marketplace located at
stackoverflow.com/questions/tagged/azure
-
marketplace
Stack Overflow: Azure Resource Manager located at
stackoverflow.com/questions/tagged/azure
-
resource
-
manager
Stack Overflow: Virtual Machines on Azure located at
stackoverflow.com/questions/tagged/azure
-
virtual
-
machine
Stack Overflow: Containers on Azure located at
stackoverflow.com/search?q=azure+container
The support options for AppSource.
Visit the Azure Marketplace and AppSource Publisher Guide page.

2 minutes to read

Publishing Checklist for AppSource
6/6/2018 • 2 minutes to read • Edit Online
Checklist
LISTING TYPE OFFER T YPE PUBLISHING ARTIFACT
List Consulting service
STOREFRO NT DETAILS
Offer name
(
200 characters
)
Description
(
2,000 characters
)
MPN ID
Country/region availability
Applicable industries, categories, and
search keywords
Screenshots
(
1280x720; maximum 5
)
Marketing documents
(
maximum 3
)
Lead destination
Company logos
(
48x48, 216x216
)
Competencies
Product over view video
(
optional
)
Next steps
Review required components prior to starting the publishing process.
The following artifacts are required to publish your app on AppSource.
Visit the Azure Marketplace and AppSource Publisher Guide page.

Publishing Checklist for Azure Marketplace
6/6/2018 • 2 minutes to read • Edit Online
Checklist
LISTING TYPE OFFER T YPE PUBLISHING ARTIFACT
All All
STOREFRO NT DETAILS
Offer name
(
200 characters
)
Description
(
2,000 characters
)
MPN ID
Country/region availability
Applicable industries, categories, and
search keywords
Screenshots
(
1280x720; maximum 5
)
Marketing documents
(
maximum 3
)
Lead destination
Product over view video
(
optional
)
CONTACTS
Contact information
(
support,
engineering, commercial
)
TECH NICAL INFO R M ATIO N
Terms of use and privacy policy URL
TEST DR IVE
Azure resource group name
All Virtual Machine
TECH NICAL INFO R M ATIO N
Support URL
Review required components prior to starting the publishing process.
The following artifacts are required to complete the Create Offer publishing workflow on Cloud Partner Portal.

List Consulting service
STOREFRO NT DETAILS
Duration of engagement
Company logos
(
48x48, 216x216
)
Trial All
TECH NICAL INFO R M ATIO N
Trial URL
Supported languages
App version number
App release date
Support URL
Trial Test drive
TEST DR IVE
Description
Duration
User manual
Test drive video
(
maximum 1
)
Test drive countr y/region availability
Azure subscription ID
Azure AD tenant ID
Azure AD app ID
Azure AD app key
LISTING TYPE OFFER T YPE PUBLISHING ARTIFACT

Transact Virtual Machine
STOREFRO NTS
Title
(
50 characters
)
Summary
(
200 characters
)
Long summar y
(
256 characters
)
HTML
-
based description
(
3,000
characters
)
Company logos
(
40x40, 90x90,
115x115, 255x115, 815x290
)
SKU
Operating system details
Ports in use
Protocols in use
Disk version for each VHD in use
SAS URL for each VHD in use
Transact Azure apps: Solution template
STOREFRO NTS
Title
(
50 characters
)
Summary
(
200 characters
)
Long summar y
(
256 characters
)
HTML
-
based description
(
3,000
characters
)
Company logos
(
40x40, 90x90,
115x115, 255x115, 815x290
)
SKU
Version number
Package file that contains
LISTING TYPE OFFER T YPE PUBLISHING ARTIFACT
all template files
createUIDefinition file

Transact Azure apps: Managed app
STOREFRO NTS
Title
(
50 characters
)
Summary
(
200 characters
)
Long summar y
(
256 characters
)
HTML
-
based description
(
3,000
characters
)
Company logos
(
40x40, 90x90,
115x115, 255x115, 815x290
)
SKU
Version number
Package file that contains
LISTING TYPE OFFER T YPE PUBLISHING ARTIFACT
all template files
createUIDefinition file

Transact Container
STOREFRO NTS
Title
(
50 characters
)
Summary
(
200 characters
)
Long summar y
(
256 characters
)
HTML
-
based description
(
3,000
characters
)
Company logos
(
40x40, 90x90,
115x115, 255x115, 815x290
)
SKU
Azure Container Registry
(
ACR
)
Image
repositor y details: Subscription ID
ACR Image repositor y details:
Resource group name
ACR Image repositor y details:
Registry name
ACR Image repositor y details:
Repositor y name
ACR Image repositor y details: User
name
ACR Image repositor y details:
Password
ACR Image repositor y details: Image
Tags
(
optional
)
Transact SaaS app
STOREFRO NTS
Title
(
50 characters
)
Summary
(
200 characters
)
Long summar y
(
256 characters
)
HTML
-
based description
(
3,000
characters
)
Company logos
(
40x40, 90x90,
115x115, 255x115, 815x290
)
LISTING TYPE OFFER T YPE PUBLISHING ARTIFACT
Next steps
Visit the Azure Marketplace and AppSource Publisher Guide page.
